Connecting Conexio Stratus to Golioth
Preface
Millions of transactions with vending machines, gas pumps, kiosks, price checkers, and retail point-of-sales stations occur daily from internally run embedded systems. Embedded systems are used actively in the home, medical facilities, and the industrial sector. Embedded systems are also a part of machine-to-machine (M2M) interfaces like processing equipment, controllers, sensors, and robotics/automation equipment.
Uptime is important for embedded devices, but guaranteeing uptime is challenging. Having embedded devices that can work by themselves is a great time saver because you can leave them to the task that they were designed for. Therefore, remotely located, devices need to be monitored to gain visibility and the status report on the performance of these devices. Such remote management tools can alert administrators when errors occur or devices fail to work at all, so they can identify and resolve the errors quickly.
One such observability platform is Golioth. Golioth allows device makers to deliver on the promise of cloud-connected IoT, enabling hardware developers to build end-to-end IoT-connected products using their choice of hardware and connectivity, all without the need for a team of cloud engineers. From device messaging to security, firmware updates, analytics, and more, the platform provides device services that work with every developer’s hardware and firmware requirements. At the moment, Golioth supports embedded IoT devices running ZephyrRTOS. And the good news is that Golioth is now open to use for developers.
This tutorial…
Covers how to connect your Conexio Stratus device to the Golioth platform. Specifically, this post will demonstrate how to:
- Setup the toolchains and the Golioth SDK.
- Connect Stratus kit to the Golioth cloud, periodically send environmental data, and monitor the device.
- Perform Stratus Device Firmware Upgrade (DFU) procedure over the cellular network.
We have a lot to cover, so let’s dive in.
Setting Up the Toolchains
Golioth SDK is built around ZephyrRTOS and comes as a separate module. Since the Stratus device requires nRF Connect SDK for cellular connectivity, we first need to initialize the nRF Connect SDK as per the Golioth docs. So choose the directory on your machine where you want to install the Golioth SDK with the following command. For this tutorial, we are naming our directory where the Golioth SDK will reside to be golioth-sdk.
west init -m https://github.com/nrfconnect/sdk-nrf --mr v1.7.1
Once the nRF SDK is fetched, navigate to the west.yml located in golioth-sdk/nrf and add the following entry in manifest/projects/subtree
# Golioth repository.
- name: golioth
  path: modules/lib/golioth
  revision: main
  url: https://github.com/golioth/zephyr-sdk.git
  import:
    name-allowlist:
      - qcbor
After updating the west.yml file, it should now look similar to this:
...
    - name: memfault-firmware-sdk
      path: modules/lib/memfault-firmware-sdk
      revision: 0.25.0
      remote: memfault
    # Golioth repository.
    - name: golioth
      path: modules/lib/golioth
      revision: main
      url: https://github.com/golioth/zephyr-sdk.git
      import:
        name-allowlist:
          - qcbor
  # West-related configuration for the nrf repository.
  self:
    # This repository should be cloned to ncs/nrf.
    path: nrf
    # This line configures west extensions which are currently only
    # for internal use by NCS maintainers.
    west-commands: scripts/west-commands.yml
Now to clone all the required repositories, by issuing the following command:
west update
Depending on your network speed, this will take several minutes so sit back tight until the process completes. Upon successful completion, you should see the golioth directory under
golioth-sdk/modules/lib/golioth/
Bravo. For now, our SDK is all set. Let’s head over to the Golioth cloud to create an account.
Registration and Device Setup on the Golioth Cloud
Join the Golioth and create a user account here. And yes, for now joining Golioth is Free.

Once your account is created, head over to the “Projects” menu on the left-hand pane and Create a Project as shown:
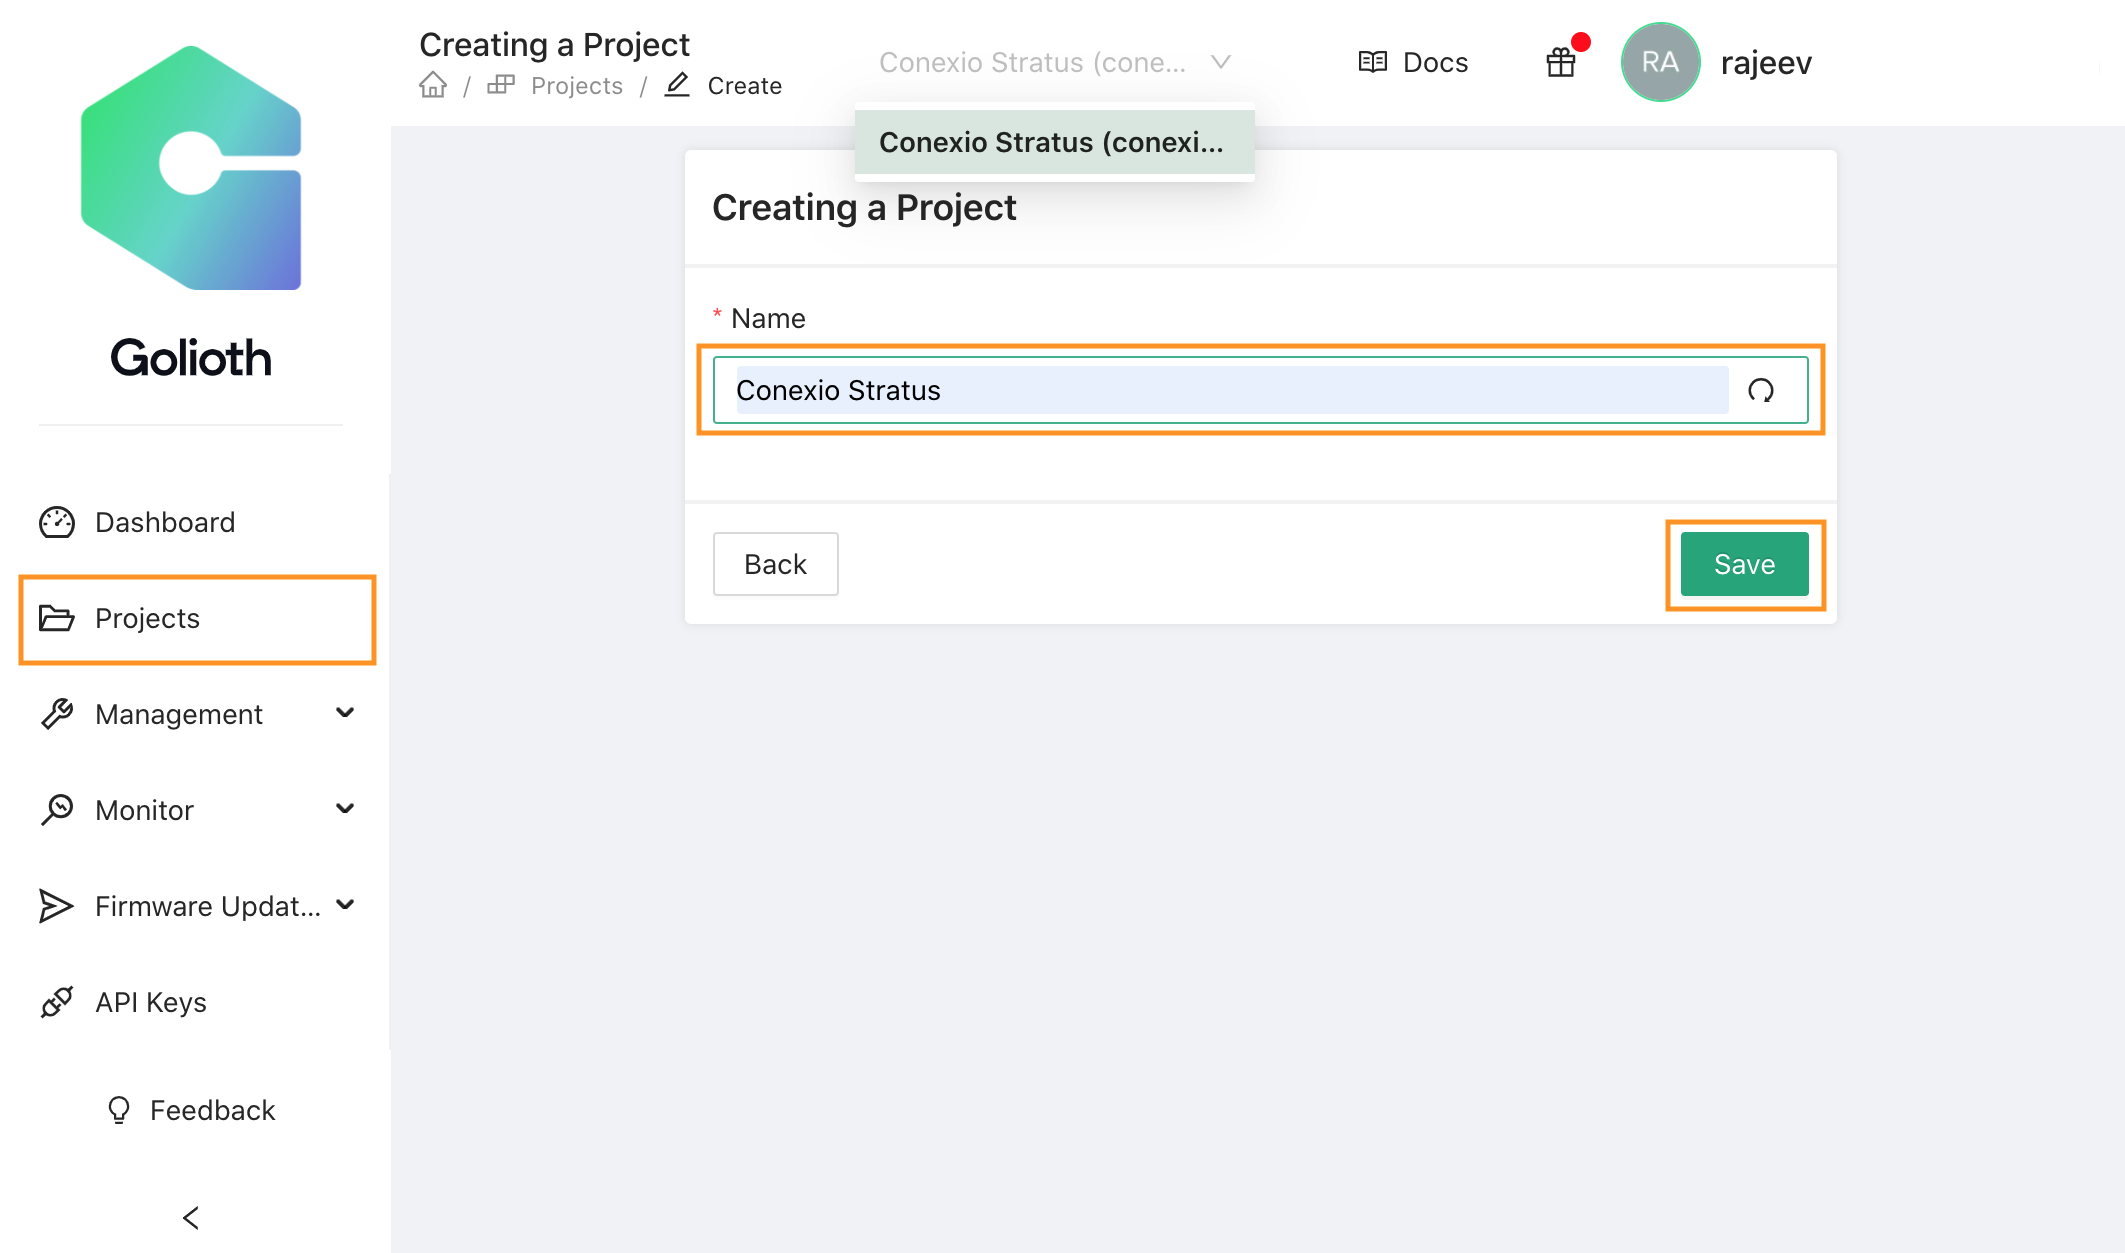
Give your device a name and click Save.
Note: One can also achieve the steps shown here using the Golioth command-line tools (CLI) as outlined in the documentation. For this tutorial, we will use the Golioth console for setting up our devices and for faster provisioning.
Next, we need to provision our devices and acquire the credentials to connect it to the Golioth platform. Expand the “Management” menu and click Devices. Then, on the right-hand top view, click Create and select Provision with Credentials.
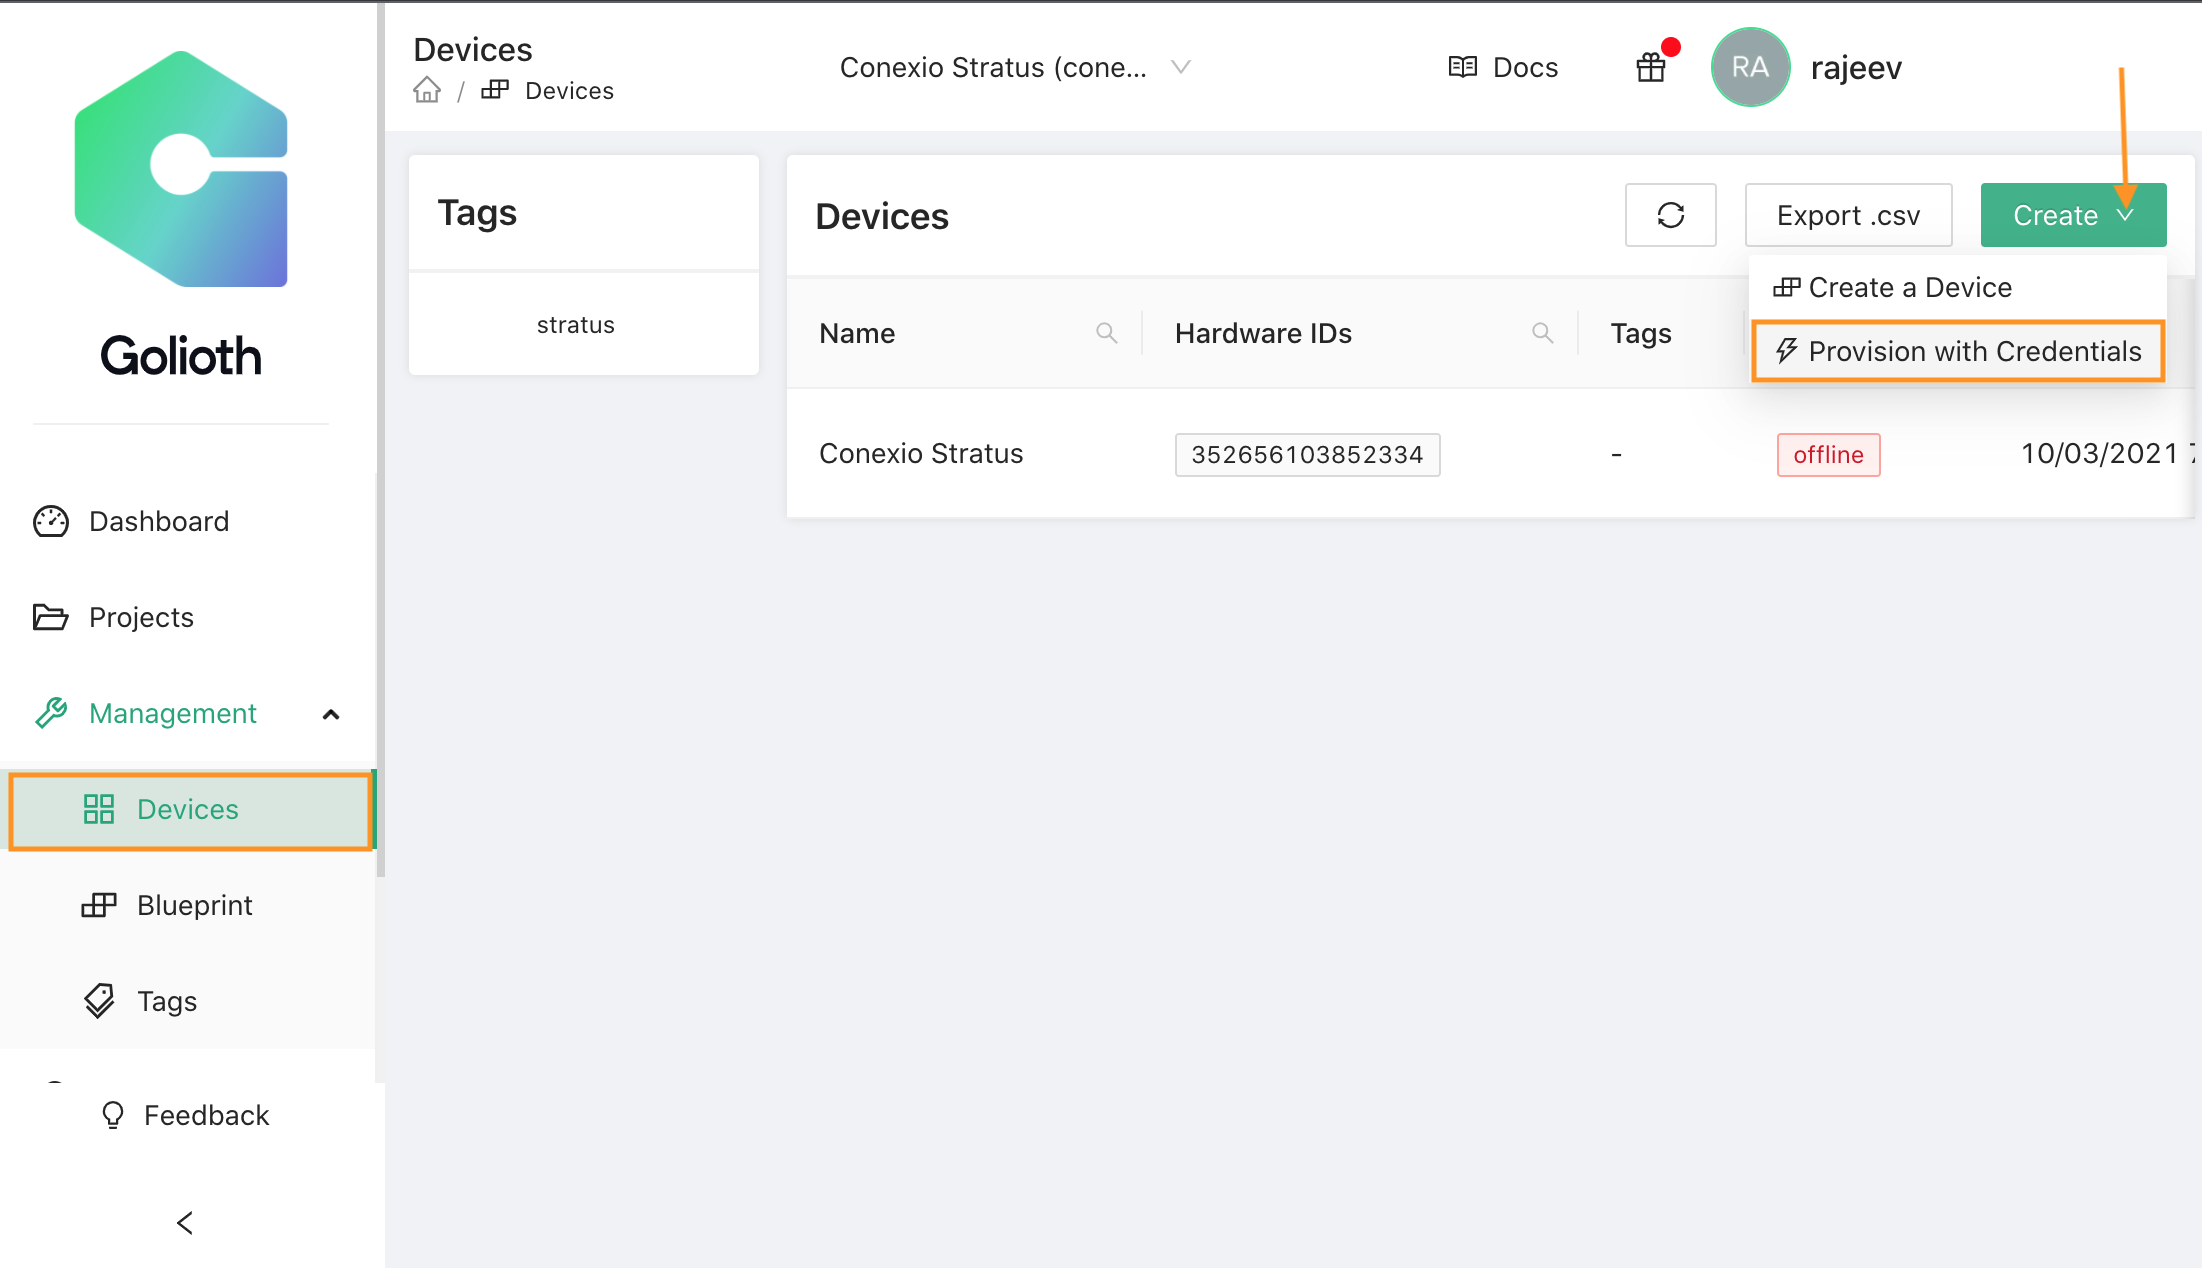
This will pop up a Device fast path Provision window as shown:
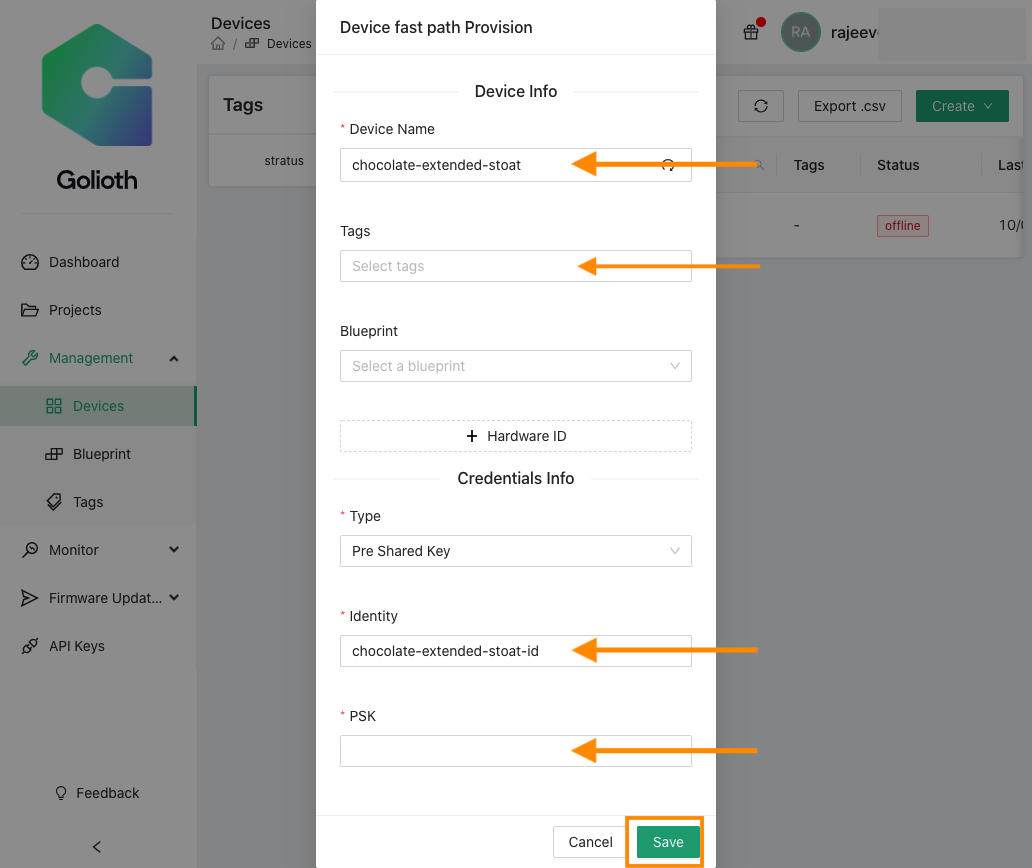
Next, choose a name for your device, give your device a tag label (read more about Golioth tags here), choose an identity (ID), or keep the default one generated automatically. Finally, add your pre-shared key (PSK) as per your liking and click Save. Later, we will need this ID and the PSK to authenticate our Stratus device with the Golioth platform.
At this point, we have all the required details to connect and publish data from our Conexio Stratus device to the Golioth. Let’s head over to the device firmware side.
Stratus Sample Application
We have extended the Light DB stream sample application provided in the Golioth SDK to connect the Stratus kit to the Golioth and stream sensory data. The extended application periodically samples the environmental data from the onboard SHT4x sensor and publishes it to the /temp and /humidity Light DB stream path. For the first part of this post, the full application can be found in the conexio-stratus-firmware/samples/golioth/stratus_lightdb_stream repo on GitHub.
Copy the project folder and place it in your Golioth SDK samples directory.
golioth-sdk/modules/lib/golioth/samples
Below is the snapshot of the code’s main loop:
void main(void)
{
	char str_temperature[32];
	char str_humidity[32];

	LOG_DBG("Start Stratus <> Golioth Light DB sensor stream sample");

	const struct device *sht = DEVICE_DT_GET_ANY(sensirion_sht4x);

	int err;

	if (!device_is_ready(sht)) {
		LOG_ERR("Device %s is not ready.\n", sht->name);
		return;
	}

	golioth_system_client_start();

	while (true) {

		/* Fetch environmental data from SHT4X sensor */
		fetch_sensor_data(sht);

		snprintk(str_temperature, sizeof(str_temperature), "%d.%06d", temp.val1, abs(temp.val2));
		str_temperature[sizeof(str_temperature) - 1] = '\0';

		LOG_DBG("Sending temperature data %s", log_strdup(str_temperature));

		err = golioth_lightdb_set(client,
					  GOLIOTH_LIGHTDB_STREAM_PATH("temp"),
					  COAP_CONTENT_FORMAT_TEXT_PLAIN,
					  str_temperature,
					  strlen(str_temperature));
		if (err) {
			LOG_WRN("Failed to send temperature data: %d", err);
		}

        /* Let previous data transaction to complete */
		k_sleep(K_SECONDS(1));

		snprintk(str_humidity, sizeof(str_humidity), "%d.%06d", hum.val1, abs(hum.val2));
		str_humidity[sizeof(str_humidity) - 1] = '\0';

		LOG_DBG("Sending humidity data %s", log_strdup(str_humidity));

		err = golioth_lightdb_set(client,
					  GOLIOTH_LIGHTDB_STREAM_PATH("humidity"),
					  COAP_CONTENT_FORMAT_TEXT_PLAIN,
					  str_humidity,
					  strlen(str_humidity));
		if (err) {
			LOG_WRN("Failed to send humidity data: %d", err);
		}
        /* Sleep for X seconds before sampling again */
		k_sleep(SLEEP_TIME_SEC);
	}
}
Add Golioth credentials to the Application Code
First, we will have to add the Golioth credentials (ID and PSK) that we configured above using the Golioth console into the application code. You will need to edit samples/stratus_lightdb_stream/prj.conf with your credentials and update the following parameters.
# Golioth credentials
CONFIG_GOLIOTH_SYSTEM_CLIENT_PSK_ID="my-psk-id"
CONFIG_GOLIOTH_SYSTEM_CLIENT_PSK="my-psk"
Compiling the Sample Application using nRF Connect for VS Code
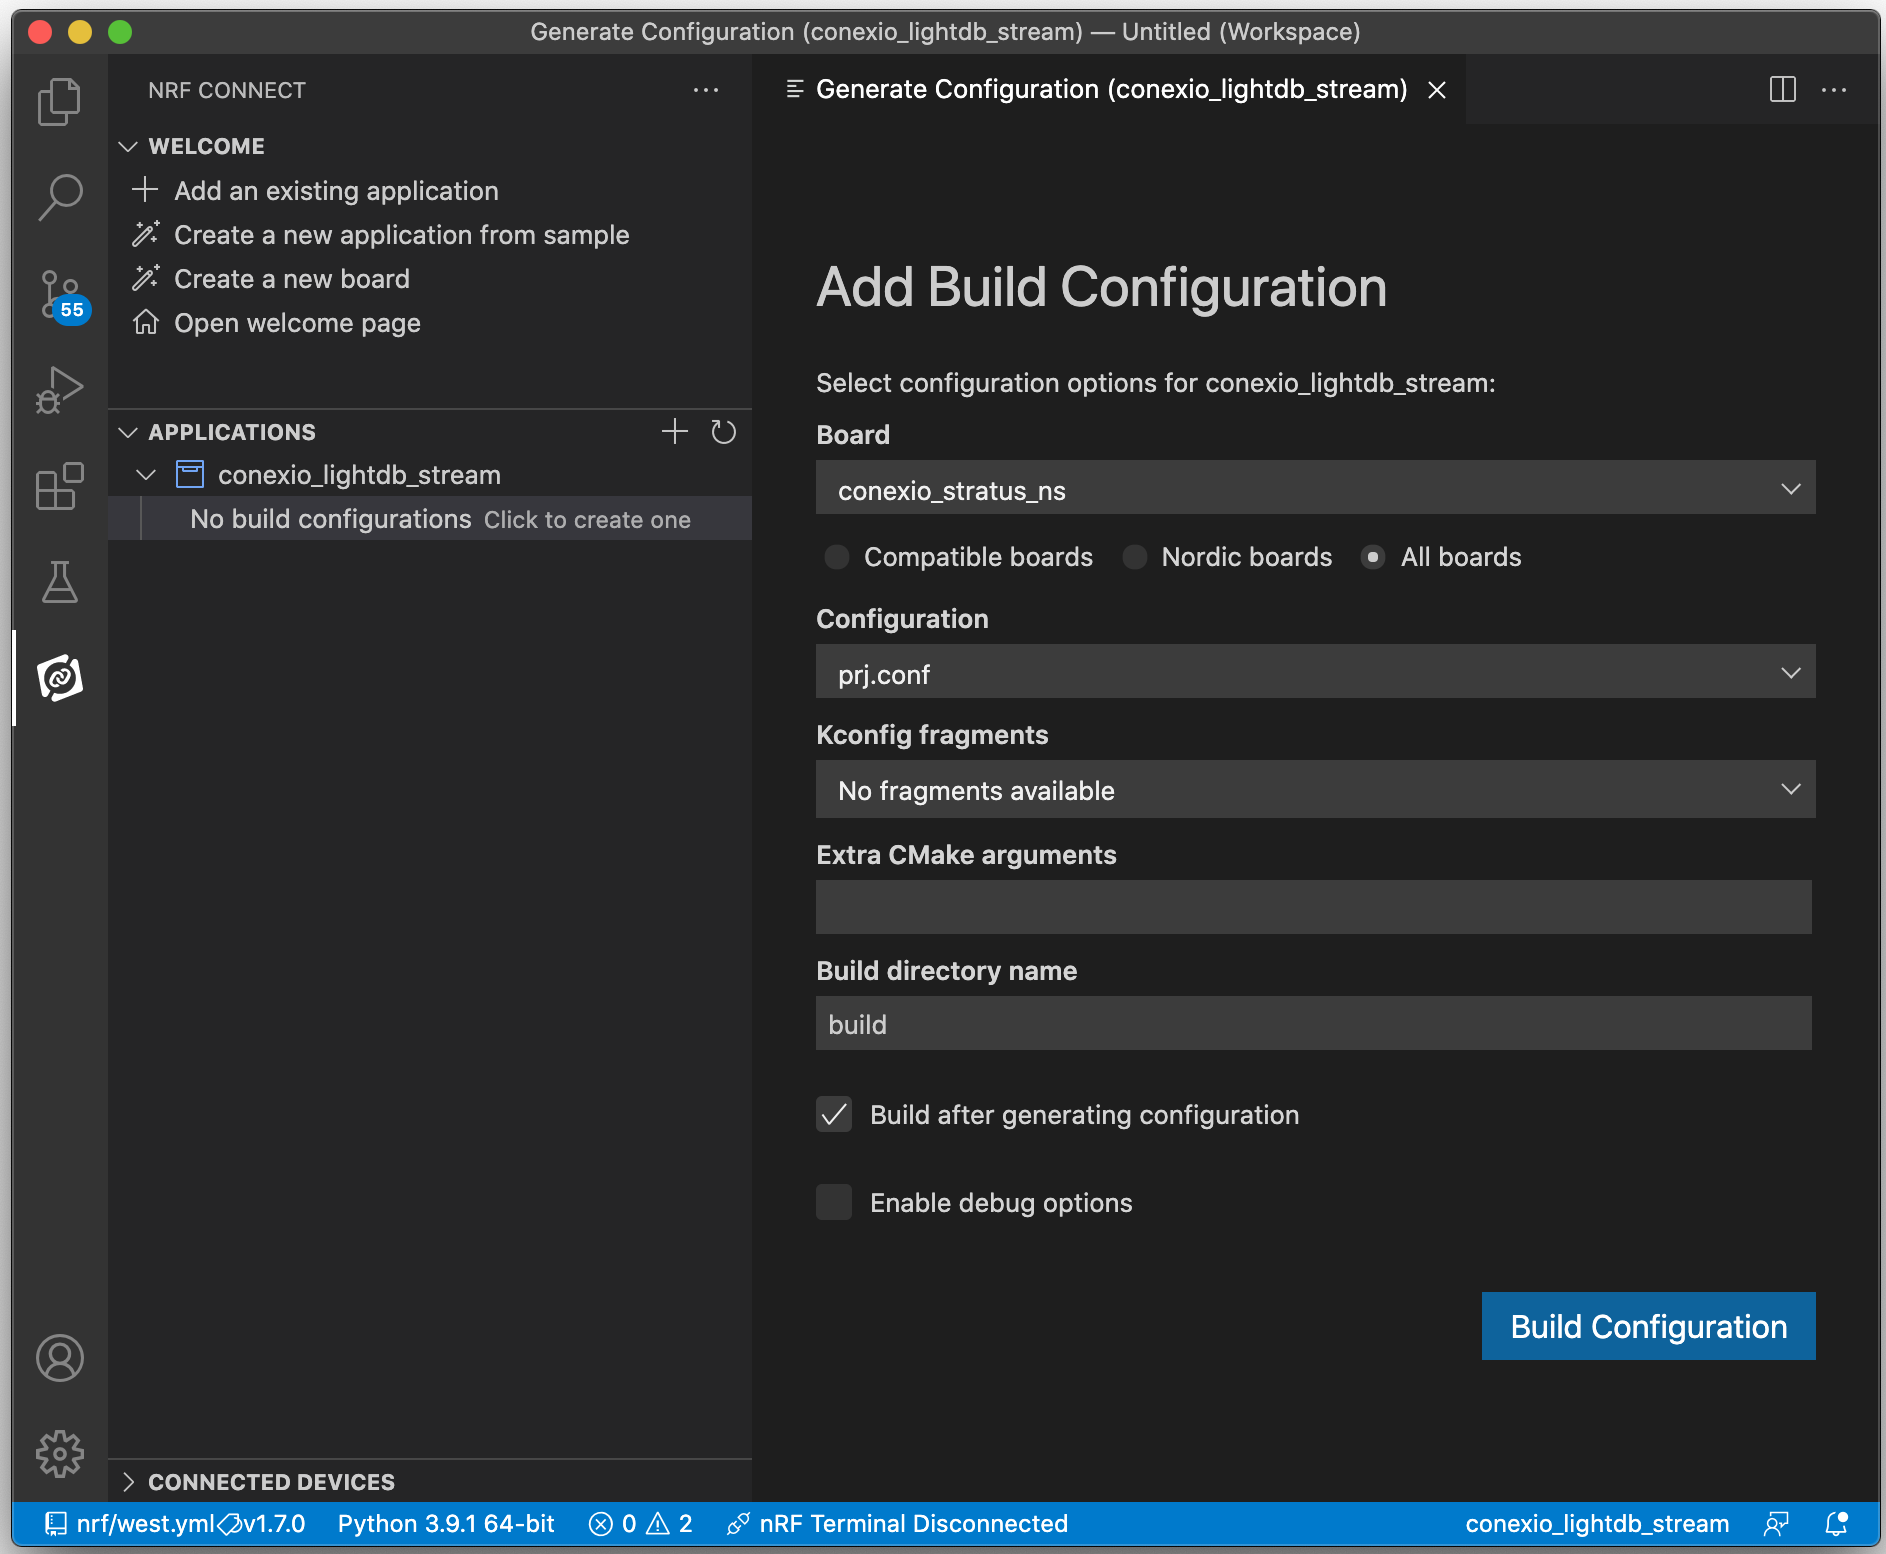
Next, open the sample application in your favorite code editor such as Visual Studio Code, or simply use the nRF Connect extension for VS Code for compiling your application. If using the nRF Connect extension, select and open the stratus_lightdb_stream project and Add the Build Configuration as shown, and click Build Configuration. Now, you should see the build process kicking in the background and generating the required files and binaries for the sample application.
Once the project is compiled successfully, in the project navigation panel, you will see all the generated files.
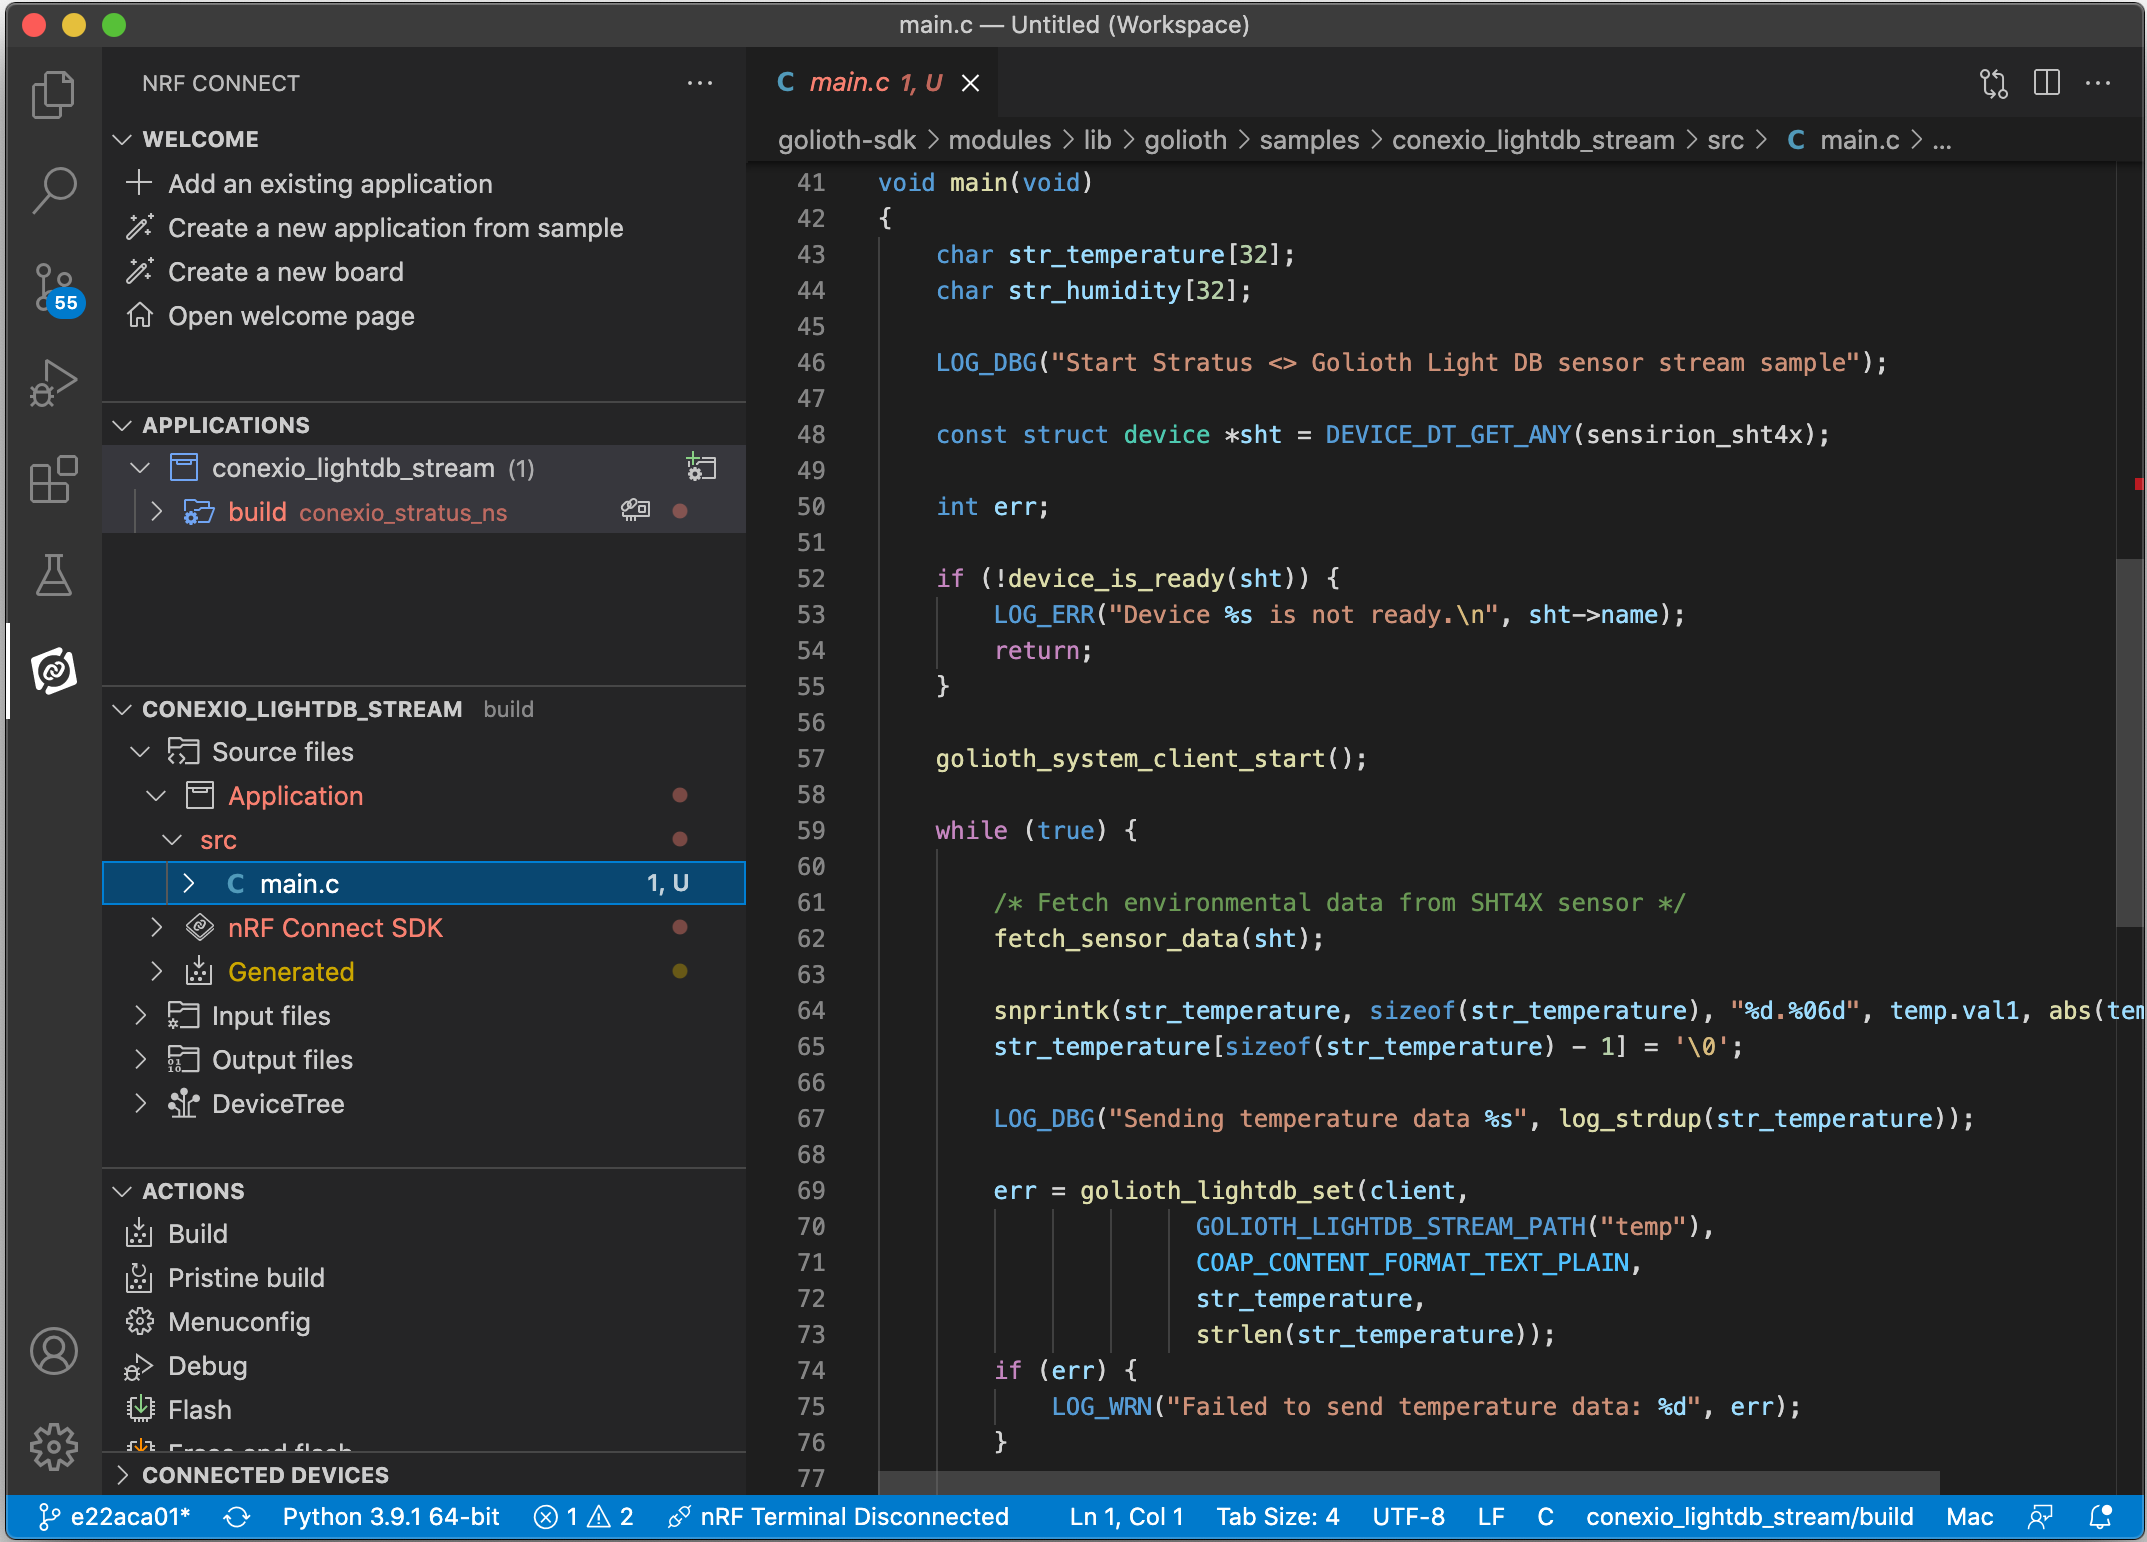
Well done! You have successfully managed to compile the sample application using the nRF Connect extension.
Compiling the Sample Application using West
To compile the application using west, open a terminal window in the application directory (stratus_lightdb_stream) and issue the following command:
west build -b conexio_stratus_ns
In case you do not want to recall the west commands simply command the following in the terminal, and the included python script will take care of the rest.
python3 ./generate_firmware.py
Flashing the Sample Application
Once the application is compiled successfully using either of the tools above, connect the Stratus device to the USB port and put it into the DFU mode.
Flash the compiled firmware using newtmgr:
newtmgr -c serial image upload build/zephyr/app_update.bin
Open up a serial console with a baud rate of 115200 and reset the Stratus device. The following serial UART output will be displayed in the terminal.
uart:~$ *** Booting Zephyr OS build v2.6.99-ncs1-rc2  ***
<inf> golioth_system: Initializing
<dbg> golioth_lightdb_stream.main: Start Stratus <> Golioth Light DB sensor stream sample
<inf> golioth_system: Starting connect
<dbg> golioth_lightdb_stream.main: Sending temperature data 25.961318
<inf> golioth_system: Client connected!
<dbg> golioth_lightdb_stream.main: Sending humidity data 17.426406
<dbg> golioth_lightdb_stream.main: Sending temperature data 25.971999
<dbg> golioth_lightdb_stream.main: Sending humidity data 17.373001
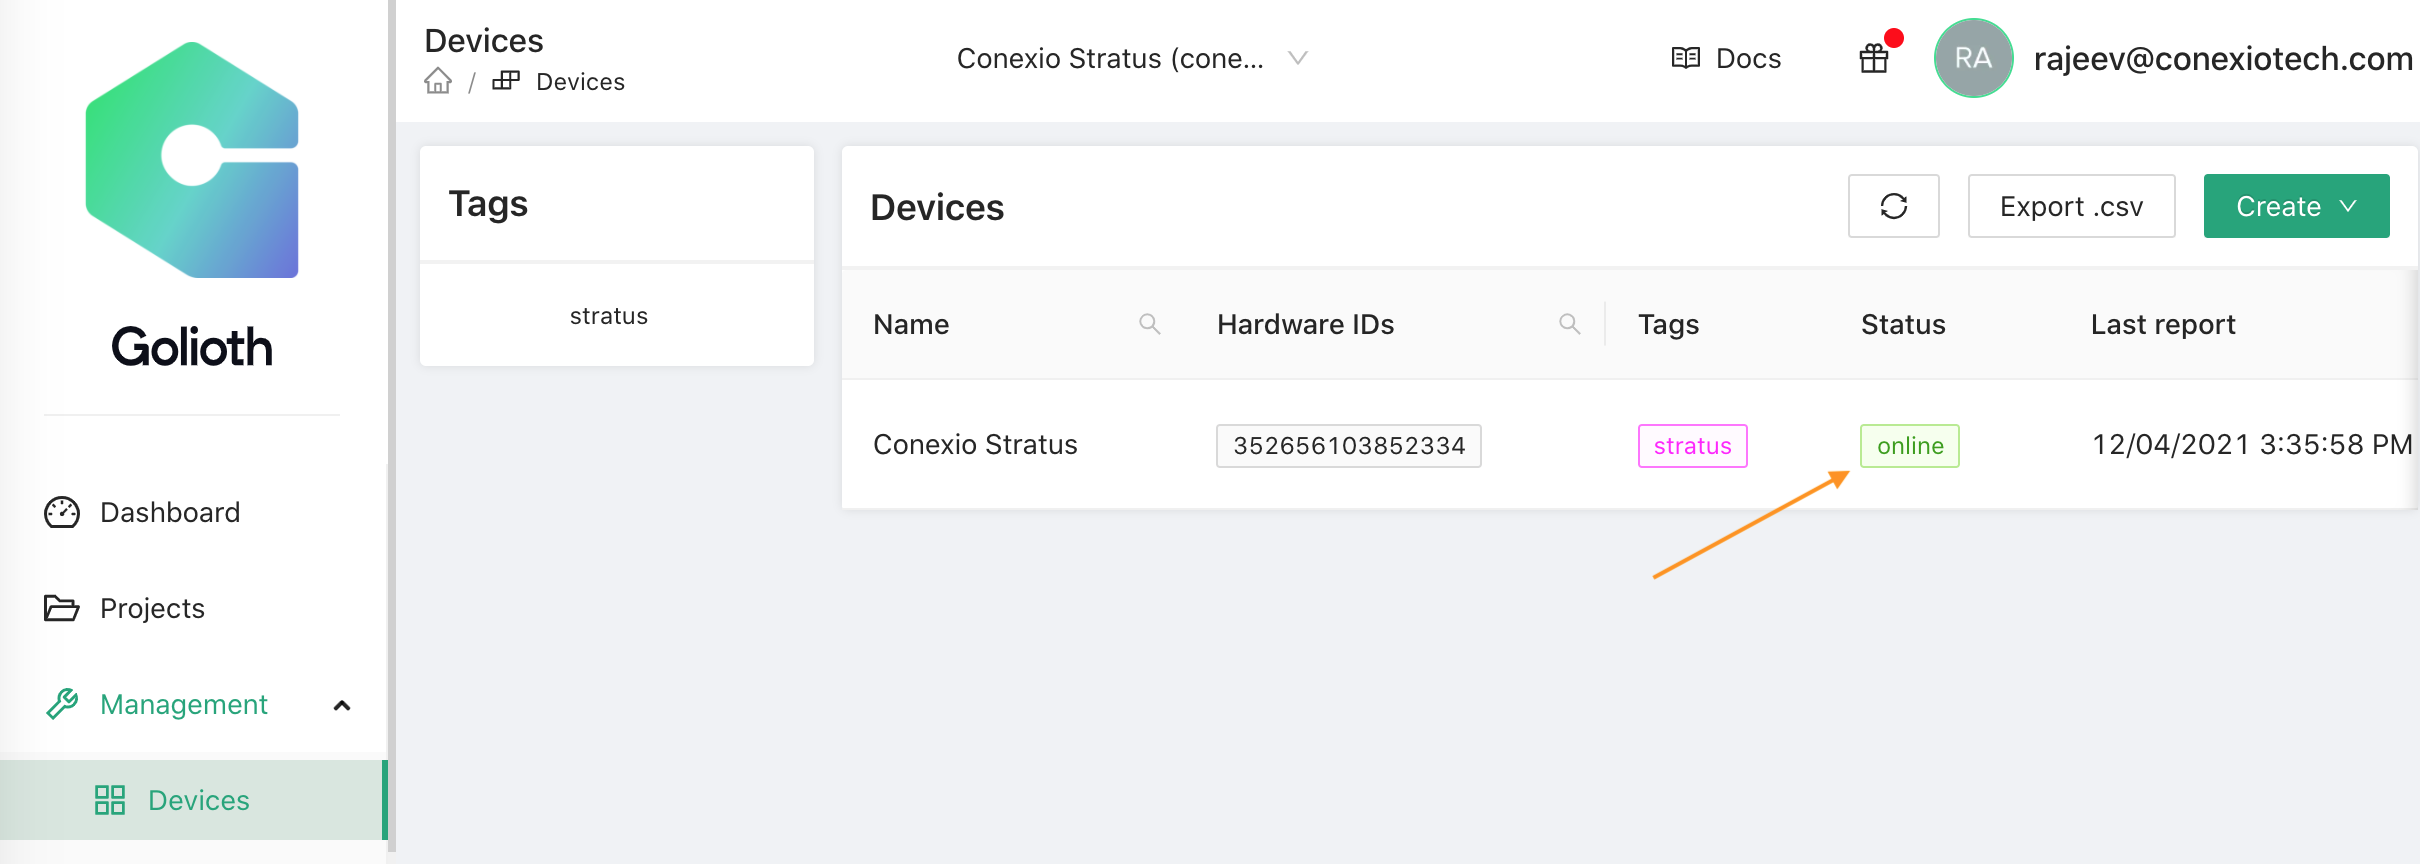
Once the device is connected to the Golioth cloud, it will start sending the environmental data. To confirm that the Stratus device is actually connected and communicating to the Golioth backend, head over to the Golioth console, and your device Status should now indicate as “online”.
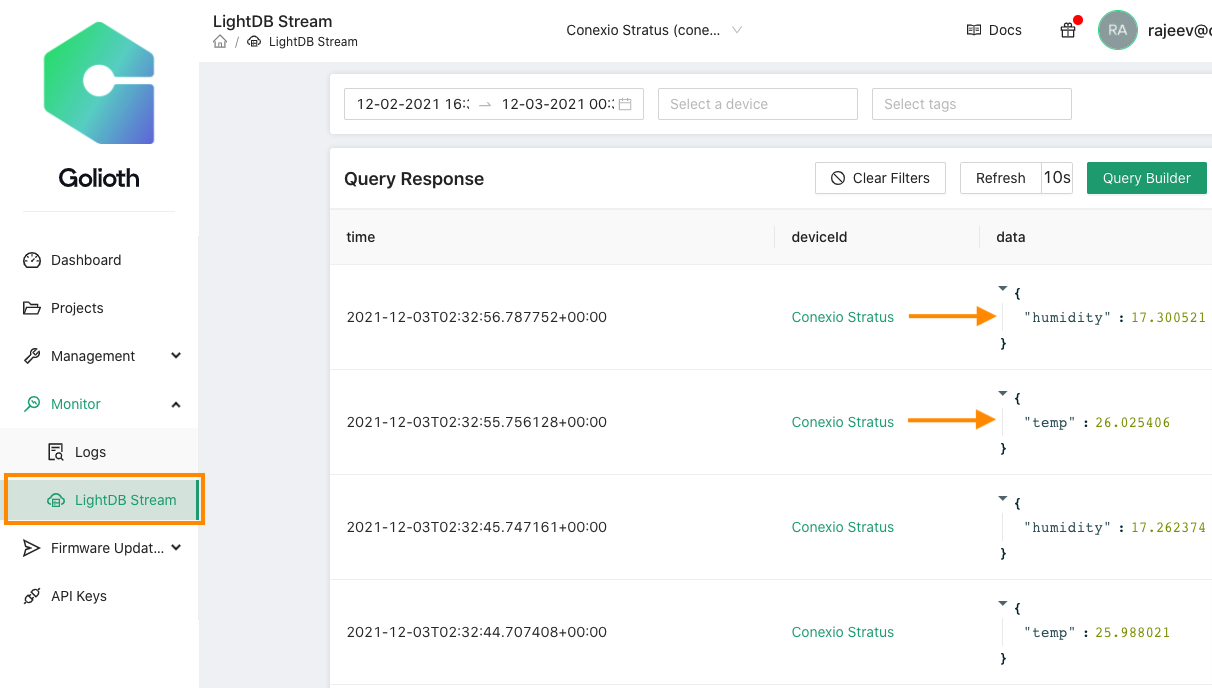
To observe the incoming data from the Stratus device, on the left-hand under the Monitor menu, click Light DB Stream and the Query Response window will appear. One should now see the incoming data from the device as shown below.
If you do “Houston, we have lift-off”… 🚀. Your device is now connected and communicating with the Golioth cloud.
Explore around the console to see other features currently offered by the Golioth platform. One such feature that is of utmost importance for IoT devices is the ability to update firmware remotely. We will next look into this feature with a sample application.
Device Firmware Update (DFU) using Golioth
Over-the-air (OTA) firmware updates are a vital component of any IoT system. Over-the-air firmware updates refer to the practice of remotely updating the code on an embedded device.
The value of incorporating OTA update capabilities into a connected product include:
- The ability to add new software features to a product after a device has been deployed in the field to improve functionality over time.
- The opportunity to rapidly respond to bugs and security vulnerabilities without the need for physical recalls of devices or truck rolls; an expensive task for the business.
- Ensuring embedded developers can quickly prototype and seamlessly roll out new versions of the device firmware, speeding up innovation cycles.
Recently, Golioth has released a firmware update feature in their latest SDK. Using this, we will demonstrate how to:
- Generate a new firmware that is compatible and can be updated remotely to the Stratus device.
- Perform the DFU procedure using the Golioth console by creating Artifacts and Releasing the firmware to the fleet of devices.
Overview of the DFU Sample Application
The DFU sample application extends the Light DB stream example that we have explored above for connecting the Stratus to the Golioth platform with an added ability to periodically check for any firmware updates. This mimics the realistic IoT application where a remote device might be performing some tasks (here, frequently sampling and sending the environmental data) while also being able to be updated remotely with new features or bug fixes.
The sample application for Stratus DFU resides in the conexio-stratus-firmware/samples/golioth/stratus_dfu repo on GitHub. Go ahead and copy the project folder and place it in your Golioth SDK samples directory.
golioth-sdk/modules/lib/golioth/samples
Add Golioth credentials to the Application Code
Add your Golioth credentials by editing the samples/stratus_dfu/prj.conf
and update the following parameters.
# Golioth credentials
CONFIG_GOLIOTH_SYSTEM_CLIENT_PSK_ID="my-psk-id"
CONFIG_GOLIOTH_SYSTEM_CLIENT_PSK="my-psk"
Building and Flashing the Sample Application
Open a terminal window in the application directory (stratus_dfu) and compile the firmware for the Stratus device using:
west build -b conexio_stratus_ns
Once the application is compiled successfully, connect the Stratus device to the USB port and put it into the DFU mode.
Next, flash the compiled firmware using newtmgr:
newtmgr -c serial image upload build/zephyr/app_update.bin
Open up a serial console and reset the Stratus device. The following sample serial UART output will be displayed:
uart:~$ *** Booting Zephyr OS build v2.6.99-ncs1-1  ***
<inf> golioth_system: Initializing
<dbg> golioth_dfu.main: Start DFU sample
<inf> golioth_system: Starting connect
<inf> golioth_system: Client connected!
<dbg> golioth_dfu.main: Sending temperature data 26.185626
<dbg> golioth_dfu.main: Sending humidity data 16.270538
So far so good. This is similar to our previous example. Next, we will prepare the new firmware version that we would like to update the Stratus device with remotely.
Generating New OTA Firmware
For testing the DFU mechanism, we need to first assign a new firmware version during the image build process to distinguish between the current running firmware (golden image) and the new incoming one.
To generate the new application firmware, execute the following command:
west build -b conexio_stratus_ns -- -DCONFIG_MCUBOOT_IMAGE_VERSION=\"2.0.0\"
Here, we have named our new image to be version 2.0.0. You can assign a version number to anything you like which makes identifying the firmware release easier.
Creating the OTA Firmware Release
In order to create a new firmware release, two steps are required. First, in the Golioth console, we need to Create an Artifact. An Artifact is simply the actual firmware binary that we have generated above which is compatible with the MCUboot mechanism. MCUboot is a library that can be integrated into a bootloader to securely perform firmware updates.
Under Firmware Updates, click Artifacts, and Creating an Artifact window will open.
Assign a name to the Package, followed by the Version number. Here, we have assigned a name as “main” with firmware version “2.0.0” (same as the version number we used when generating the DFU firmware above).
Under Artifacts, navigate to the build folder of your project and upload the following binary: app_update.bin.
stratus_dfu/build/zephyr/app_update.bin
Next, hit Save.
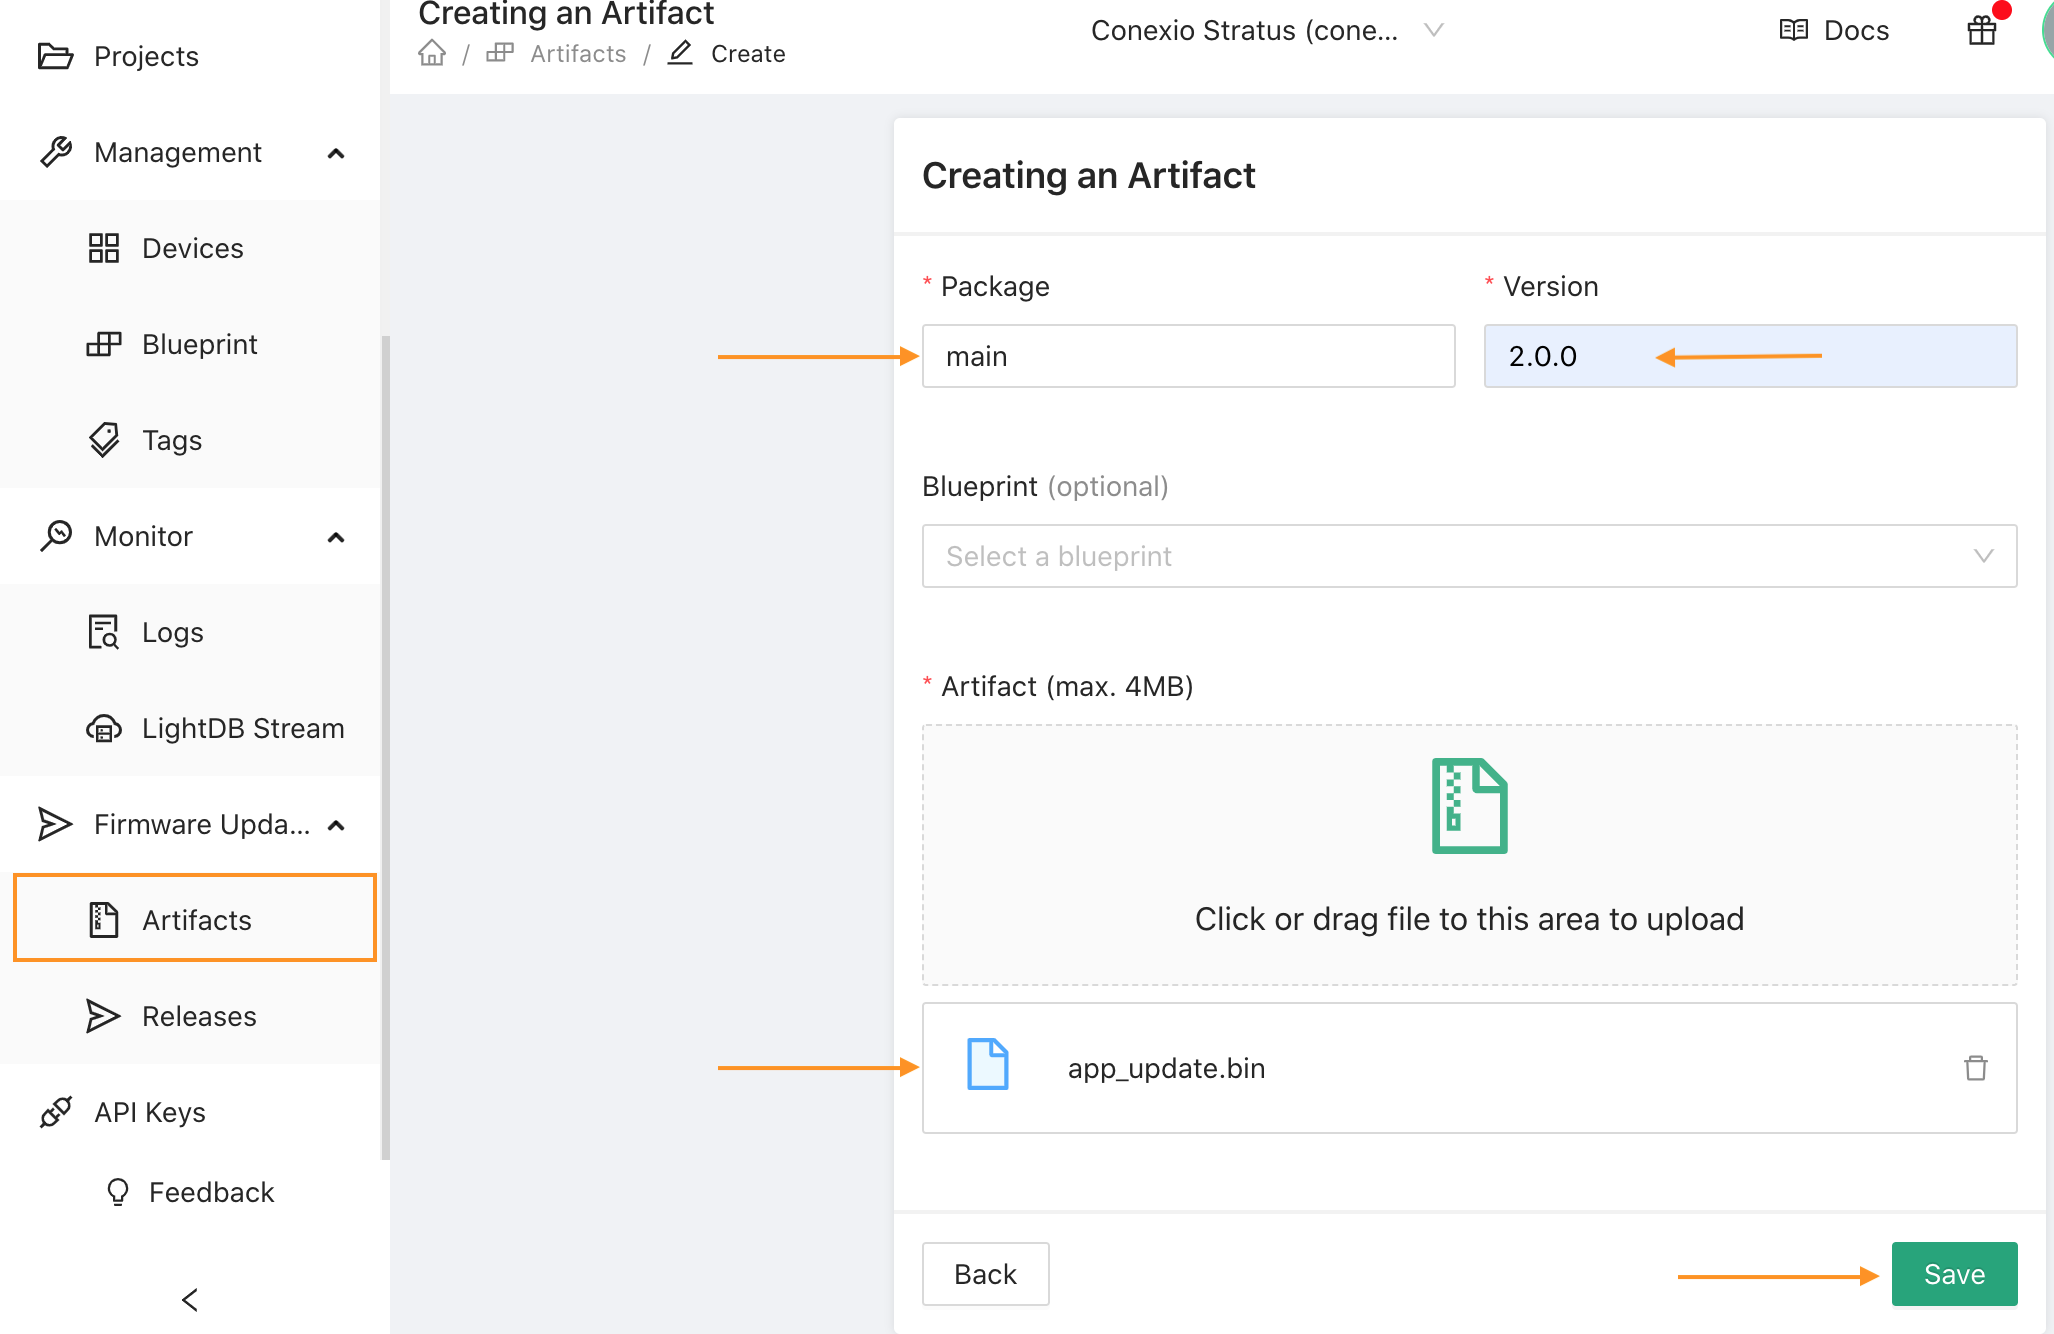
After saving the Artifact, you should now see the Size of the binary that will be transmitted to the device to be updated with Type as mcuboot.

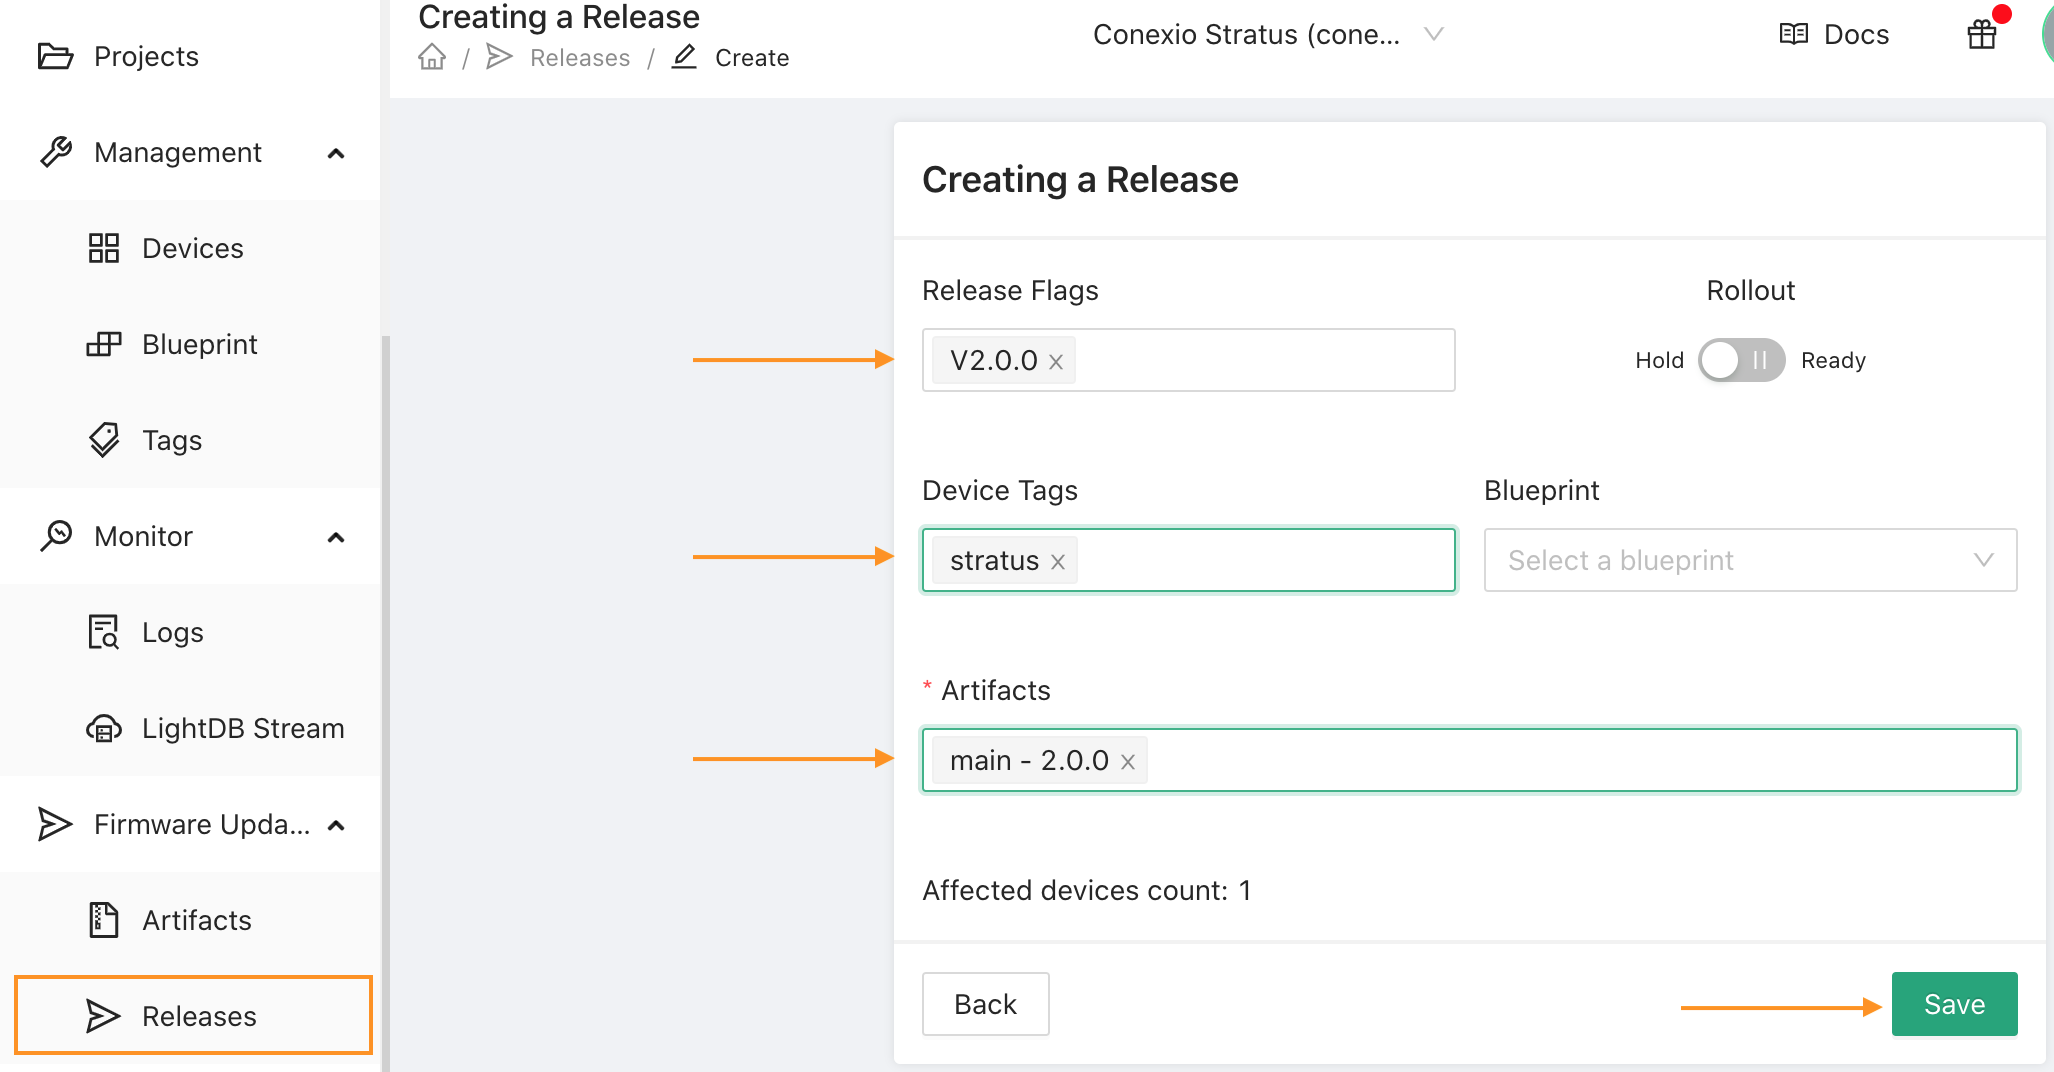
The next step is to create the Release. Creating a Release allows the rolling out of the latest firmware to the targeted fleet of devices. To do so, click Release on the left-hand menu, and set the Release Flag as your choice. Here we have chosen V2.0.0 to indicate that we are releasing version 2.0.0 of the firmware.
Next, assign the Device Tags. Device Tags allows releasing the firmware to the subset of your fleet. In our case, we will only release the latest firmware to those devices that are tagged with “stratus”. You will notice that for this demonstration, our “Affected devices count” is 1, indicating that only one device that has been tagged with “stratus” will be updated out of the entire fleet of devices. Other devices will remain untouched. A cool feature, I think!
Finally, select your Artifacts, which will be the artifact that we created above, and click Save.
Upon saving the release, you should now see all the designated parameters.

At this point, if you are happy with the firmware release, go ahead and enable Rollout by toggling the Rollout button. Enabling rollout allows the Golioth cloud to send down the firmware to the remote device/s, the next time when the devices connect to the Golioth cloud.
As soon as you hit rollout, you will now notice the following activity on the device side.
[00:00:04.971,679] <inf> golioth_system: Client connected!
[00:00:05.489,624] <dbg> golioth_dfu: Desired
                                       a3 01 1a 61 ac 13 f0 02  78 40 33 61 64 34 32 37 |...a.... x@3ad427
                                       32 35 31 38 31 66 38 37  31 36 39 32 62 65 35 66 |25181f87 1692be5f
                                       62 66 65 32 32 32 62 32  30 37 61 61 33 64 34 35 |bfe222b2 07aa3d45
                                       37 35 62 39 34 30 30 36  36 30 64 36 63 30 30 38 |75b94006 60d6c008
                                       66 37 66 34 30 36 33 32  33 33 03 81 a6 01 64 6d |f7f40632 33....dm
                                       61 69 6e 02 65 32 2e 30  2e 30 03 78 40 63 39 35 |ain.e2.0 .0.x@c95
                                       39 64 30 62 30 31 62 33  62 65 62 65 38 64 32 33 |9d0b01b3 bebe8d23
                                       64 63 34 61 36 63 30 33  34 36 31 36 33 64 37 61 |dc4a6c03 46163d7a
                                       37 65 36 66 63 33 63 39  31 64 66 31 31 30 38 63 |7e6fc3c9 1df1108c
                                       37 37 39 32 38 31 35 65  30 61 32 35 36 04 1a 00 |7792815e 0a256...
                                       04 88 a4 05 70 2f 2e 75  2f 63 2f 6d 61 69 6e 40 |....p/.u /c/main@
                                       32 2e 30 2e 30 06 67 6d  63 75 62 6f 6f 74       |2.0.0.gm cuboot
[00:00:05.489,929] <inf> golioth: Manifest sequence-number: 1638667248
[00:00:06.066,284] <dbg> golioth_dfu.data_received: Received 1024 bytes at offset 0
[00:00:06.066,436] <inf> mcuboot_util: Swap type: none
[00:00:06.066,436] <inf> golioth_dfu: swap type: none
[00:00:06.670,684] <dbg> golioth_dfu.data_received: Received 1024 bytes at offset 1024
[00:00:07.221,252] <dbg> golioth_dfu.data_received: Received 1024 bytes at offset 2048
[00:00:07.735,870] <dbg> golioth_dfu.data_received: Received 1024 bytes at offset 3072
[00:00:08.340,301] <dbg> golioth_dfu.data_received: Received 1024 bytes at offset 4096
[00:00:09.010,253] <dbg> golioth_dfu.data_received: Received 1024 bytes at offset 5120
...
The Stratus device detects the desired incoming image and starts receiving the new firmware in chunks of 1kb over the cellular network. Once the full image has been received (which might take a minute or two depending on the size) and saved onto the internal flash of the nRF9160 SiP, the device will start the firmware upgrade procedure by commanding a reboot.
...
[00:02:41.984,100] <dbg> golioth_dfu.data_received: Received 1024 bytes at offset 294912
[00:02:42.606,506] <dbg> golioth_dfu.data_received: Received 1024 bytes at offset 295936
[00:02:43.055,969] <dbg> golioth_dfu.data_received: Received 827 bytes at offset 296960 (last)
[00:02:43.155,822] <inf> golioth_dfu: Requesting upgrade
[00:02:43.156,188] <inf> golioth_dfu: Rebooting in 1 second(s)
At this point, the MCUboot will start fetching the information of the image from the image start address, verify, and mark the images ready to be installed after which it will load the newly downloaded image.
Once the boot process has been successfully completed you will now see the latest firmware running on your Stratus device:
uart:~$ *** Booting Zephyr OS build v2.6.99-ncs1-1  ***
[00:00:00.216,461] <inf> golioth_system: Initializing
[00:00:02.709,014] <dbg> golioth_dfu.main: Starting Stratus DFU sample
[00:00:02.709,167] <inf> golioth_system: Starting connect
[00:00:02.718,475] <dbg> golioth_dfu.main: Sending temperature data 26.383230
[00:00:03.719,146] <dbg> golioth_dfu.main: Sending humidity data 19.673294
[00:00:04.032,409] <inf> golioth_system: Client connected!
[00:00:04.481,170] <dbg> golioth_dfu: Desired
                                       a3 01 1a 61 ac 13 f0 02  78 40 33 61 64 34 32 37 |...a.... x@3ad427
                                       32 35 31 38 31 66 38 37  31 36 39 32 62 65 35 66 |25181f87 1692be5f
                                       62 66 65 32 32 32 62 32  30 37 61 61 33 64 34 35 |bfe222b2 07aa3d45
                                       37 35 62 39 34 30 30 36  36 30 64 36 63 30 30 38 |75b94006 60d6c008
                                       66 37 66 34 30 36 33 32  33 33 03 81 a6 01 64 6d |f7f40632 33....dm
                                       61 69 6e 02 65 32 2e 30  2e 30 03 78 40 63 39 35 |ain.e2.0 .0.x@c95
                                       39 64 30 62 30 31 62 33  62 65 62 65 38 64 32 33 |9d0b01b3 bebe8d23
                                       64 63 34 61 36 63 30 33  34 36 31 36 33 64 37 61 |dc4a6c03 46163d7a
                                       37 65 36 66 63 33 63 39  31 64 66 31 31 30 38 63 |7e6fc3c9 1df1108c
                                       37 37 39 32 38 31 35 65  30 61 32 35 36 04 1a 00 |7792815e 0a256...
                                       04 88 a4 05 70 2f 2e 75  2f 63 2f 6d 61 69 6e 40 |....p/.u /c/main@
                                       32 2e 30 2e 30 06 67 6d  63 75 62 6f 6f 74       |2.0.0.gm cuboot
[00:00:04.481,475] <inf> golioth: Manifest sequence-number: 1638667248
[00:00:04.482,543] <inf> golioth_dfu: Desired version (2.0.0) matches current firmware version!
Note that the application running on your device now detects that the current running image version matches with the one on the Golioth cloud.
You have now successfully upgraded your Stratus device firmware using the remote firmware update capability of the Golioth platform. Mission Accomplished!
Conclusion
In this post, we have merely touched on all the features that the Golioth platform offers. However, this tutorial sets a solid foundation for connecting, monitoring, and updating your Stratus devices via the Golioth. As the Golioth team is constantly updating the platform, expect more feature rollouts soon. The full application for this tutorial can be found in the conexio-stratus-firmware repo on GitHub.
If you want to create and connect your own IoT applications without having to worry about cellular data or contracts, grab your own Conexio Stratus kit today.
Thank you and happy coding. 🙏