Getting Started with nRF Connect for Visual Studio Code
Preface
An Integrated Development Environment (IDE) is a software application that provides a programming environment to streamline developing and debugging software. Rather than performing all the steps required to make an executable program or generate a binary firmware as unrelated individual tasks, IDEs bring all the tools needed into one application and workspace. Each of the tools has an awareness of the environment, and they work in harmony to provide a very nice developer experience out of the box both for novice developers as well as experienced ones.
World without IDEs
Without IDEs, developers have to use an editor, compiler, and linker installed on their development machine to create code files, compile, and link them. This at times can be overwhelming for new developers who first need to install and configure all the required toolchains and keep a tab of various commands for generating the executable binaries to flashing the devices, especially in the embedded systems development world.
The most popular IDEs that most of us developers use on a daily basis is Visual Studio Code from Microsoft. One of the main reasons that VS Code has taken over other IDEs is the ability to support third-party extensions. These extensions allow adding additional functionalities to the VS Code, enabling one to use the VS Code for virtually any platform and coding language. Currently, some of the popular VS Code extensions out there for the embedded platforms are PlatformIO, Particle Workbench, and Arduino among others.
However, till-to-date, a proper or in other words a complete VS code extension to configure, build, and debug projects using Zephyr RTOS without modifying the underlying OS system has not been developed. PlatformIO has done a very good job, however, it still requires one to install a custom SDK to work with the PlatformIO ecosystem, at times requiring users to install a redundant SDK and occupy extra storage space if they have already installed it previously. For instance, a stock ZephyrRTOS and a modified PlatformIO based ZephyrRTOS. In addition, PlatformIO currently does not support the latest Nordic devices or nRF Connect SDK at all, hampering the application development using the PlatformIO features on these latest SoCs in the market.
There have been also ongoing discussions in the Zephyr issues thread to create such an extension specifically for Zephyr RTOS that would simplify the setup process enormously by eliminating the need for someone to learn about the details of configuring the VS Code or the underlying Zephyr toolchains.
Enter nRF Connect for Visual Studio Code.
What is nRF Connect for Visual Studio Code?
Nordic Semiconductor has recently announced and released a preview version of their nRF Connect for VS Code.
nRF Connect for VS Code is simply an extension for the Visual Studio Code. It allows nRF Connect SDK and Zephyr RTOS users to:
- Develop their application code
- Build and generate the application firmware
- Flash the image to the device and
- Debug applications
right from the VS Code environment. Simply, a one-stop-shop :)
This extension utilizes the pre-installed nRF Connect SDK and Zephyr RTOS allowing developers to switch between VS Code or command line for project development. How cool is that :)
Although this extension targets nRF Connect SDK and Zephyr RTOS, it is built to do one thing, and do that right: make Zephyr-based development a breeze. For a seamless experience, the extension provides extensive development and debugging capabilities for Nordic’s nRF91, nRF53, and nRF52 series devices on Windows, macOS, and Linux. The extension can recognize nRF dev kits with the J-Link OB interface and show their names. Developers can also use standalone J-Link/Trace devices for programming and debugging respective devices.
Note, the extension is still in development but already provides some rich and much-needed features which we will look into in this tutorial.
This tutorial…
Covers how to install the beta version of the nRF Connect extension and its dependencies, link the toolchains and the SDK, create your first project, compile, upload the firmware, and debug the application running on the device. For the development and testing of this extension, we will use a custom nRF9160 based Conexio Stratus kit connected to the nRF5340 DK via the SWD interface and VS Code for macOS with nRF Connect SDK v1.5.1. The reason for using the SWD interface is to take advantage of the debugging feature that this extension provides. We will also follow the initial guidelines provided by the Nordic on their blog for getting started with the nRF Connect for VS Code. Those who do not want to read can directly head over to the YouTube playlist created by Nordic that shows how to use the extension via walk-through videos. Here, we will cover in-depth each of these steps.
Installation
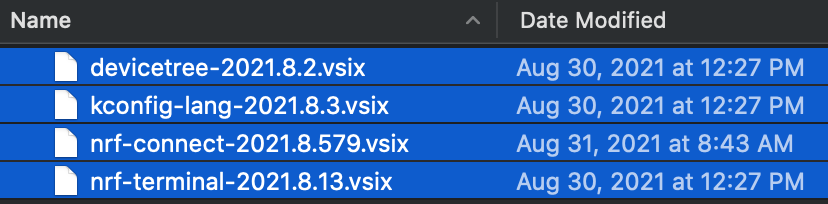
The first thing we will need is to install the Visual Studio Code if you have not already. So head towards the Visual Studio Code download site and install the version for your operating system. Next, install the latest nRF Connect SDK as per the documentation here. Then download and extract the beta nRF Connect for VS Code extension files from this download link that contains the following extensions and dependencies:
- nRF Connect for VS Code, the main extension developed by the Nordic team that contains an interface to the build system and nRF Connect SDK, as well as external tools such as guiconfig. Guiconfig is a graphical configuration interface for exploring the available Zephyr Kconfig options and making temporary changes. In addition, Cortex-Debug is installed automatically by this extension to provide debugging support for ARM Cortex-M Microcontrollers.
- DeviceTree for the Zephyr Project, which provides DeviceTree language support.
- Kconfig for the Zephyr Project, which provides Kconfig language support.
- nRF Terminal, a built-in serial and RTT terminal.
After VS Code installation, fire up the VS Code and open the Extensions view (indicated by #1) by clicking the Extensions icon in the Activity Bar on the side of the VS Code as shown, and click on the More Actions (…) dropdown menu on the upper right corner (#2).
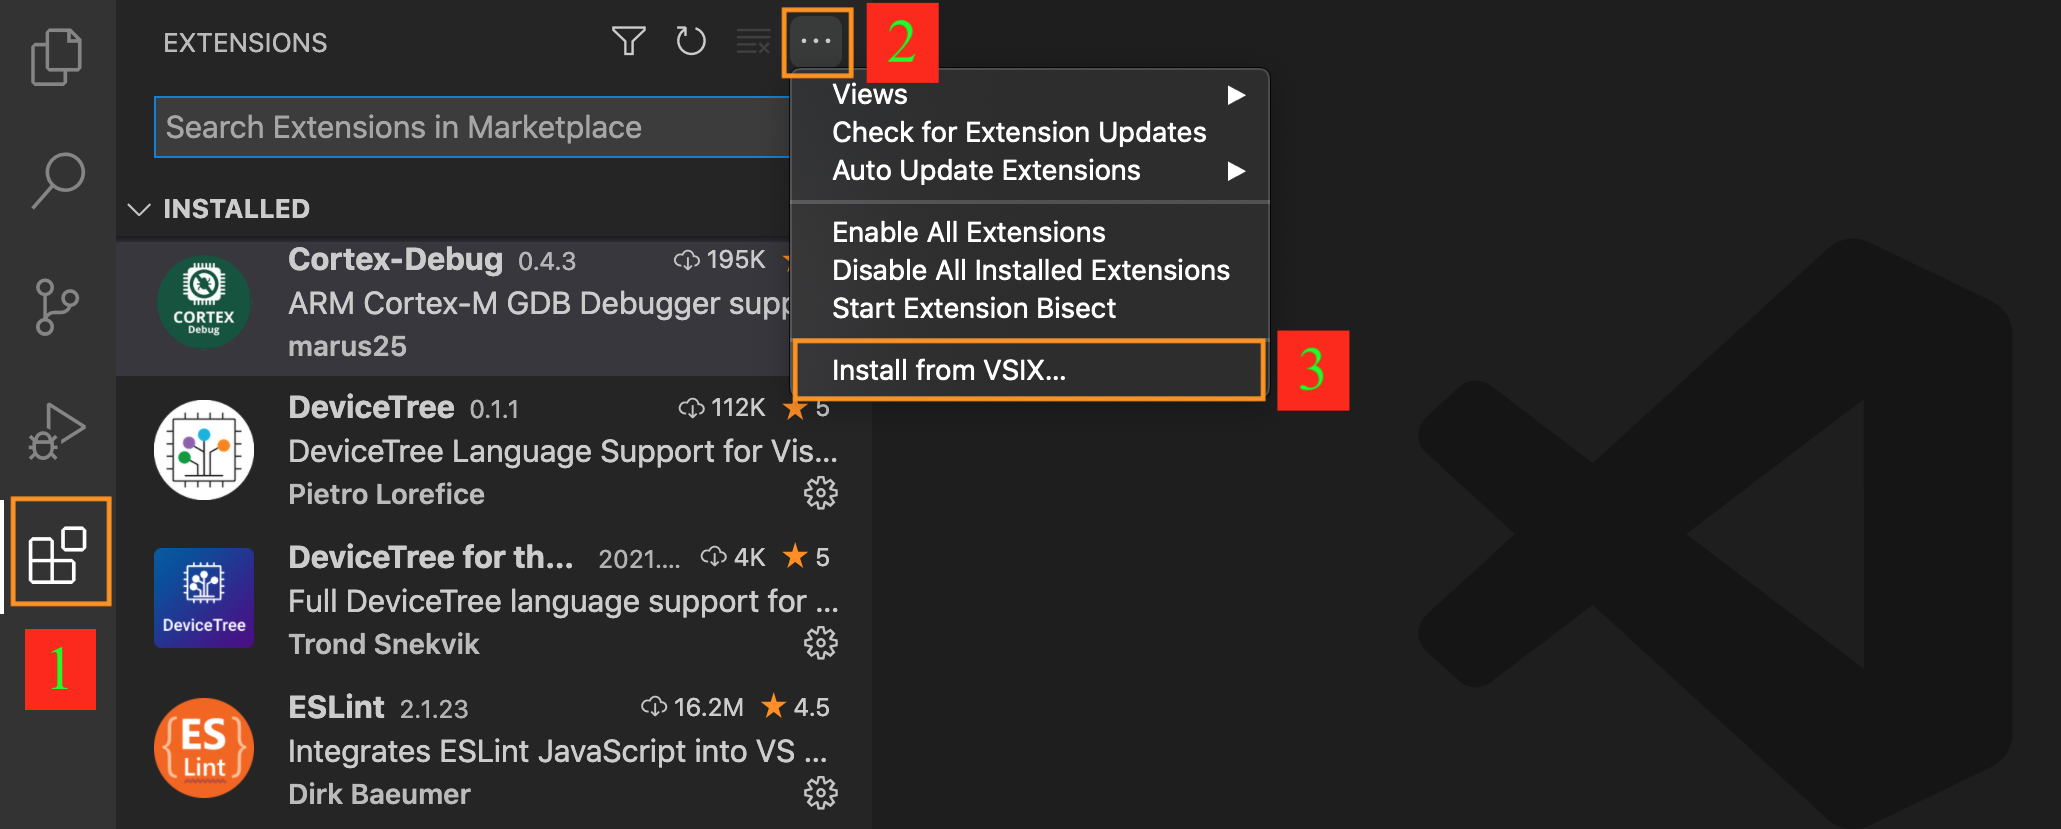
Then select the Install from VSIX… option (#3) which will open the file browser on your machine. Navigate to the extension files which we downloaded and extracted previously. Then select all the extensions and hit the ‘Install’ button.
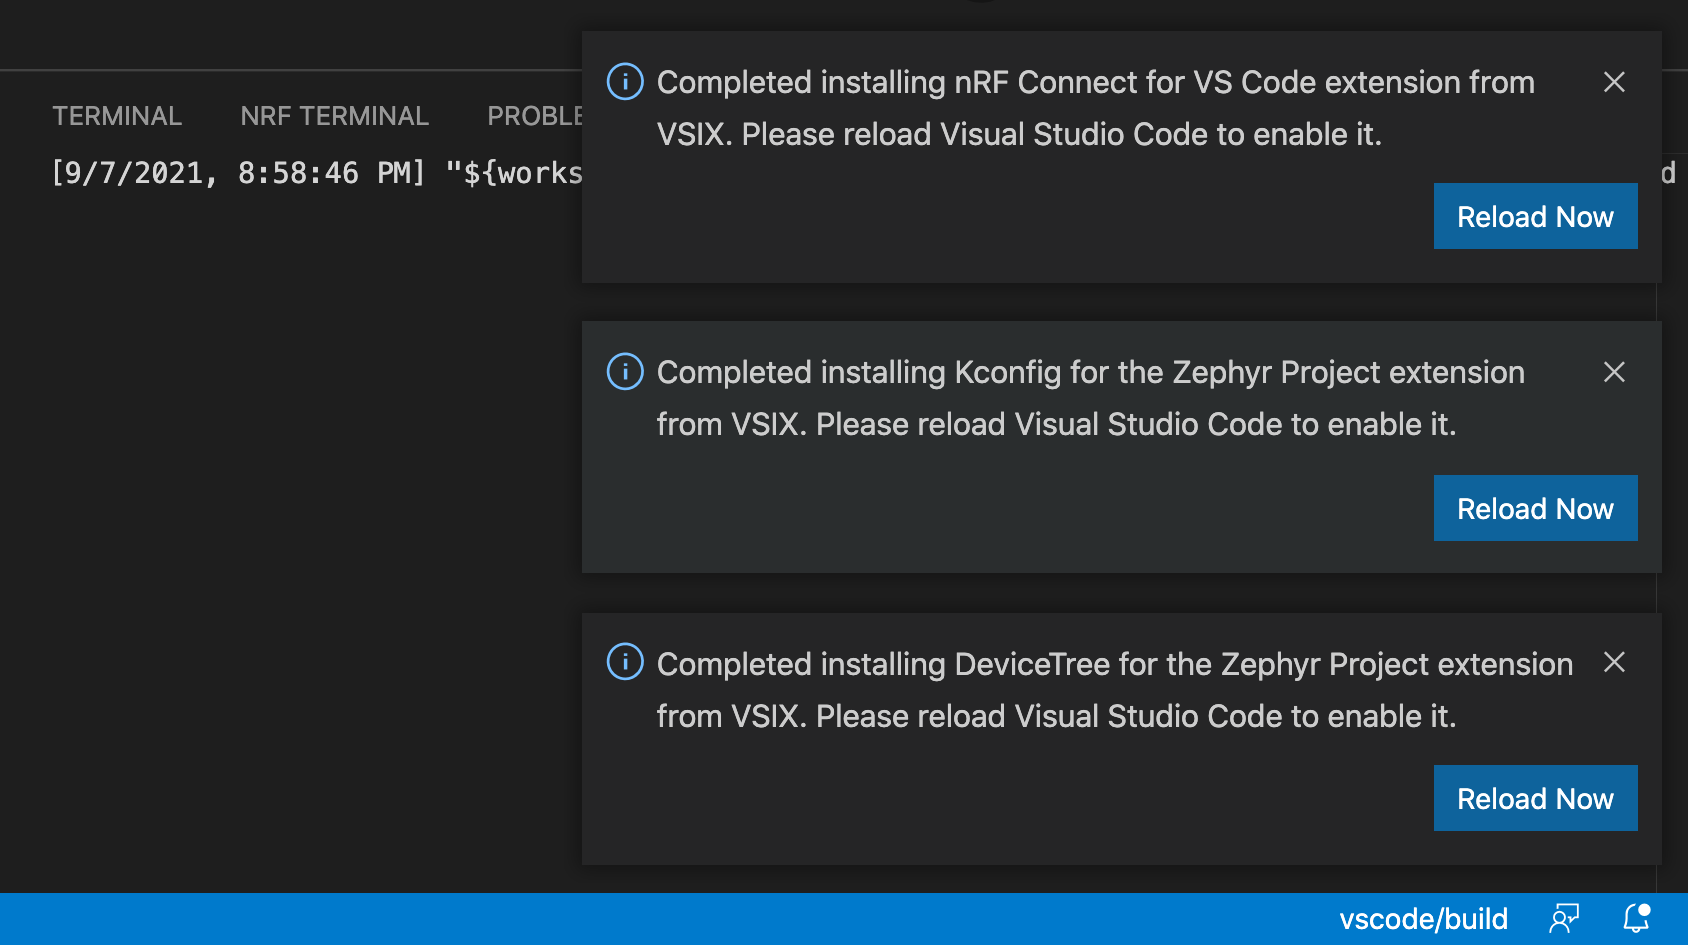
After the successful installation of the extensions, you will see the following popups. Click Reload Now for the VS Code to restart and load up the installed extensions properly.
We need one final extension before starting the configuration. Search and install the C/C++ extension from the Marketplace. This will allow code completion using IntelliSense and debugging.
Bravo!!! Now the VS Code is ready to do all the heavy lifting, i.e., toolchain and Zephyr framework management.
nRF Connect for VS Code Basics
After the installation of all the extensions, you will notice a new icon on the bottom of the Activity bar.
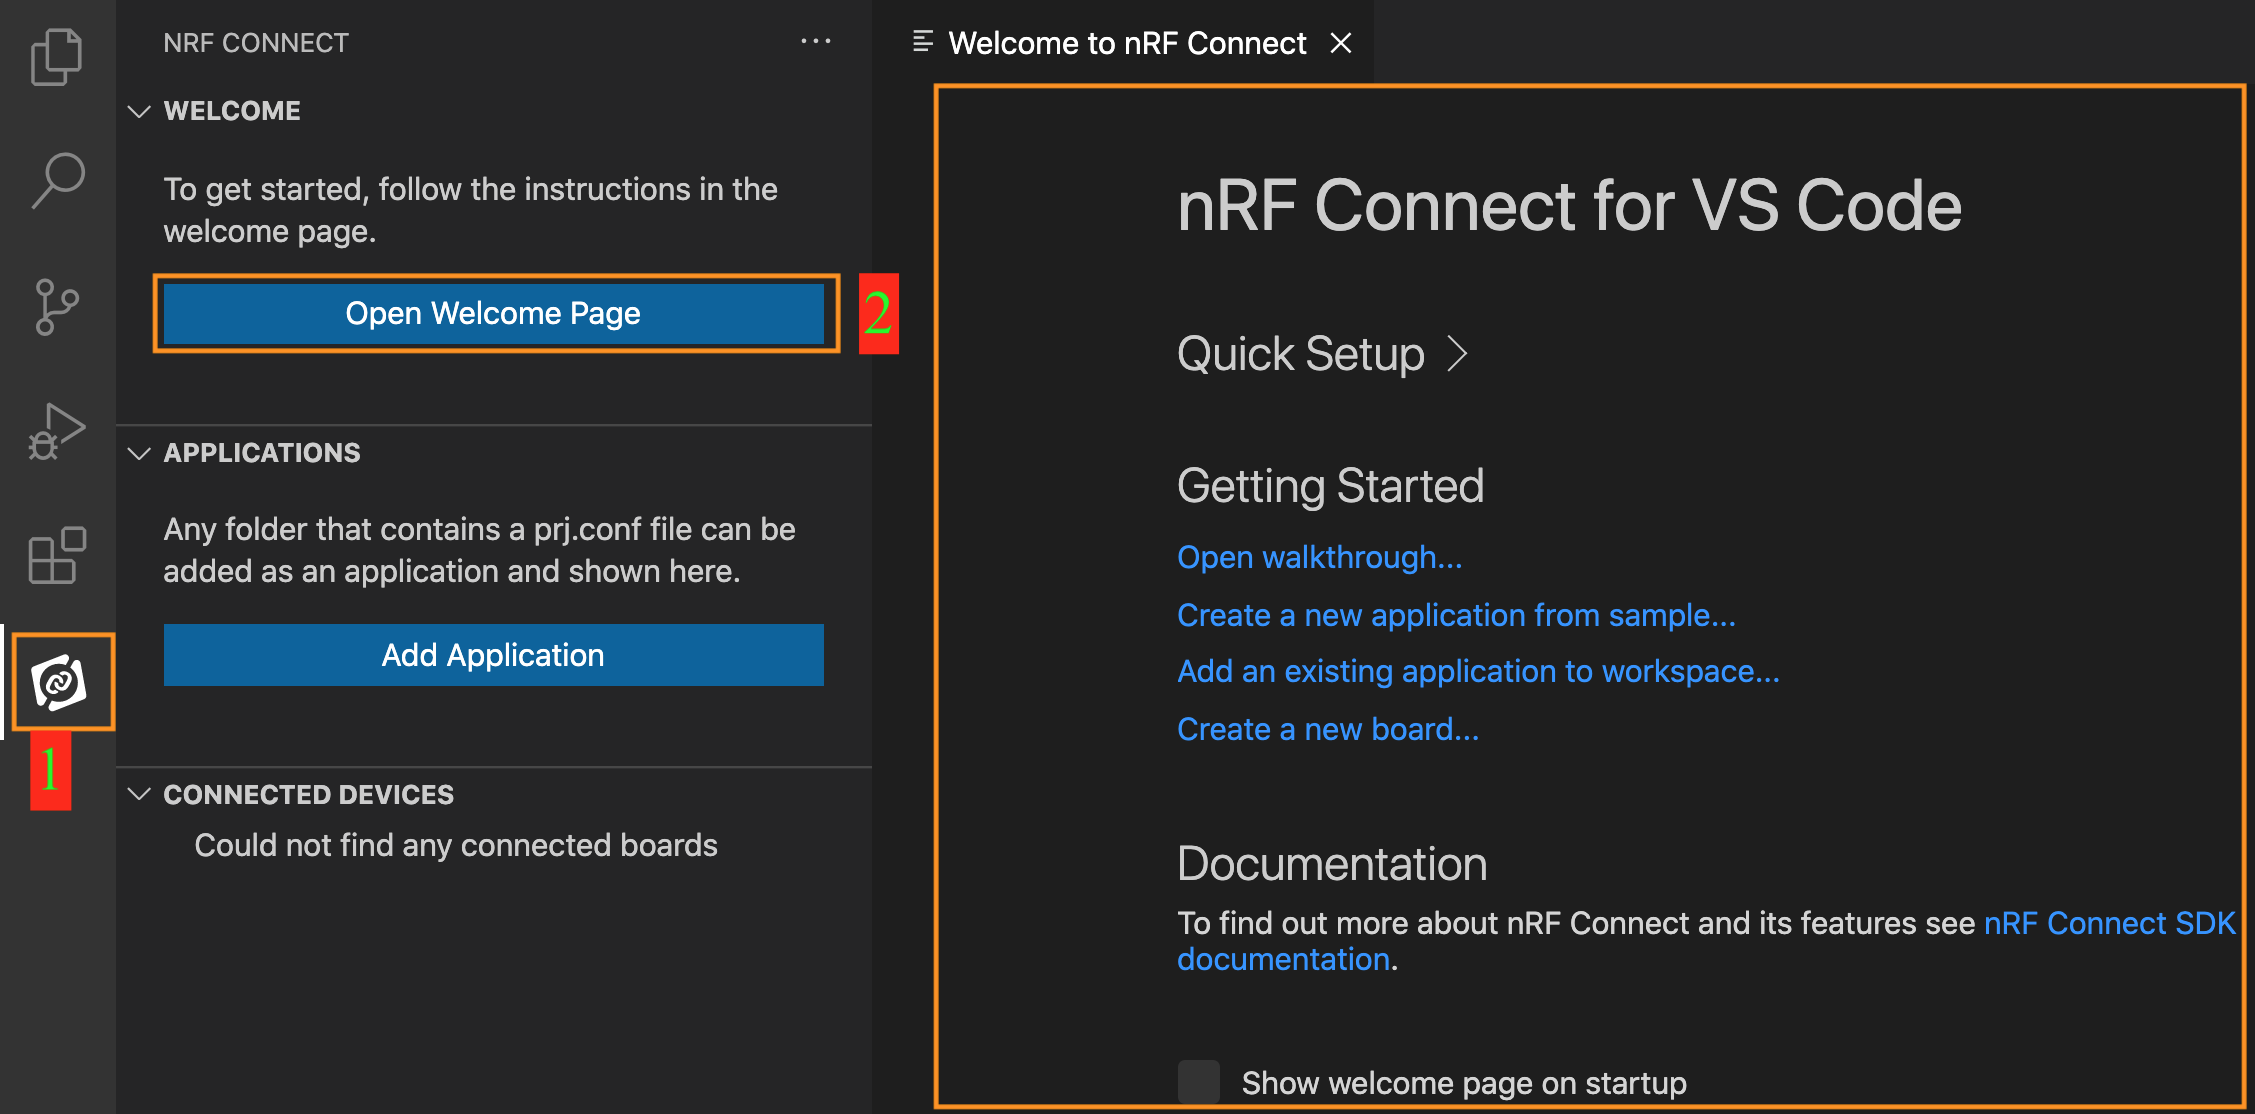
Click on the icon and then click the Open Welcome Page and you will be greeted by the nRF Connect VS Code Home Screen. The Home screen presents step by step walkthrough to link the toolchains and the nRF Connect SDK version.
To access the Quick Setup, expand the configuration menu by clicking on it.
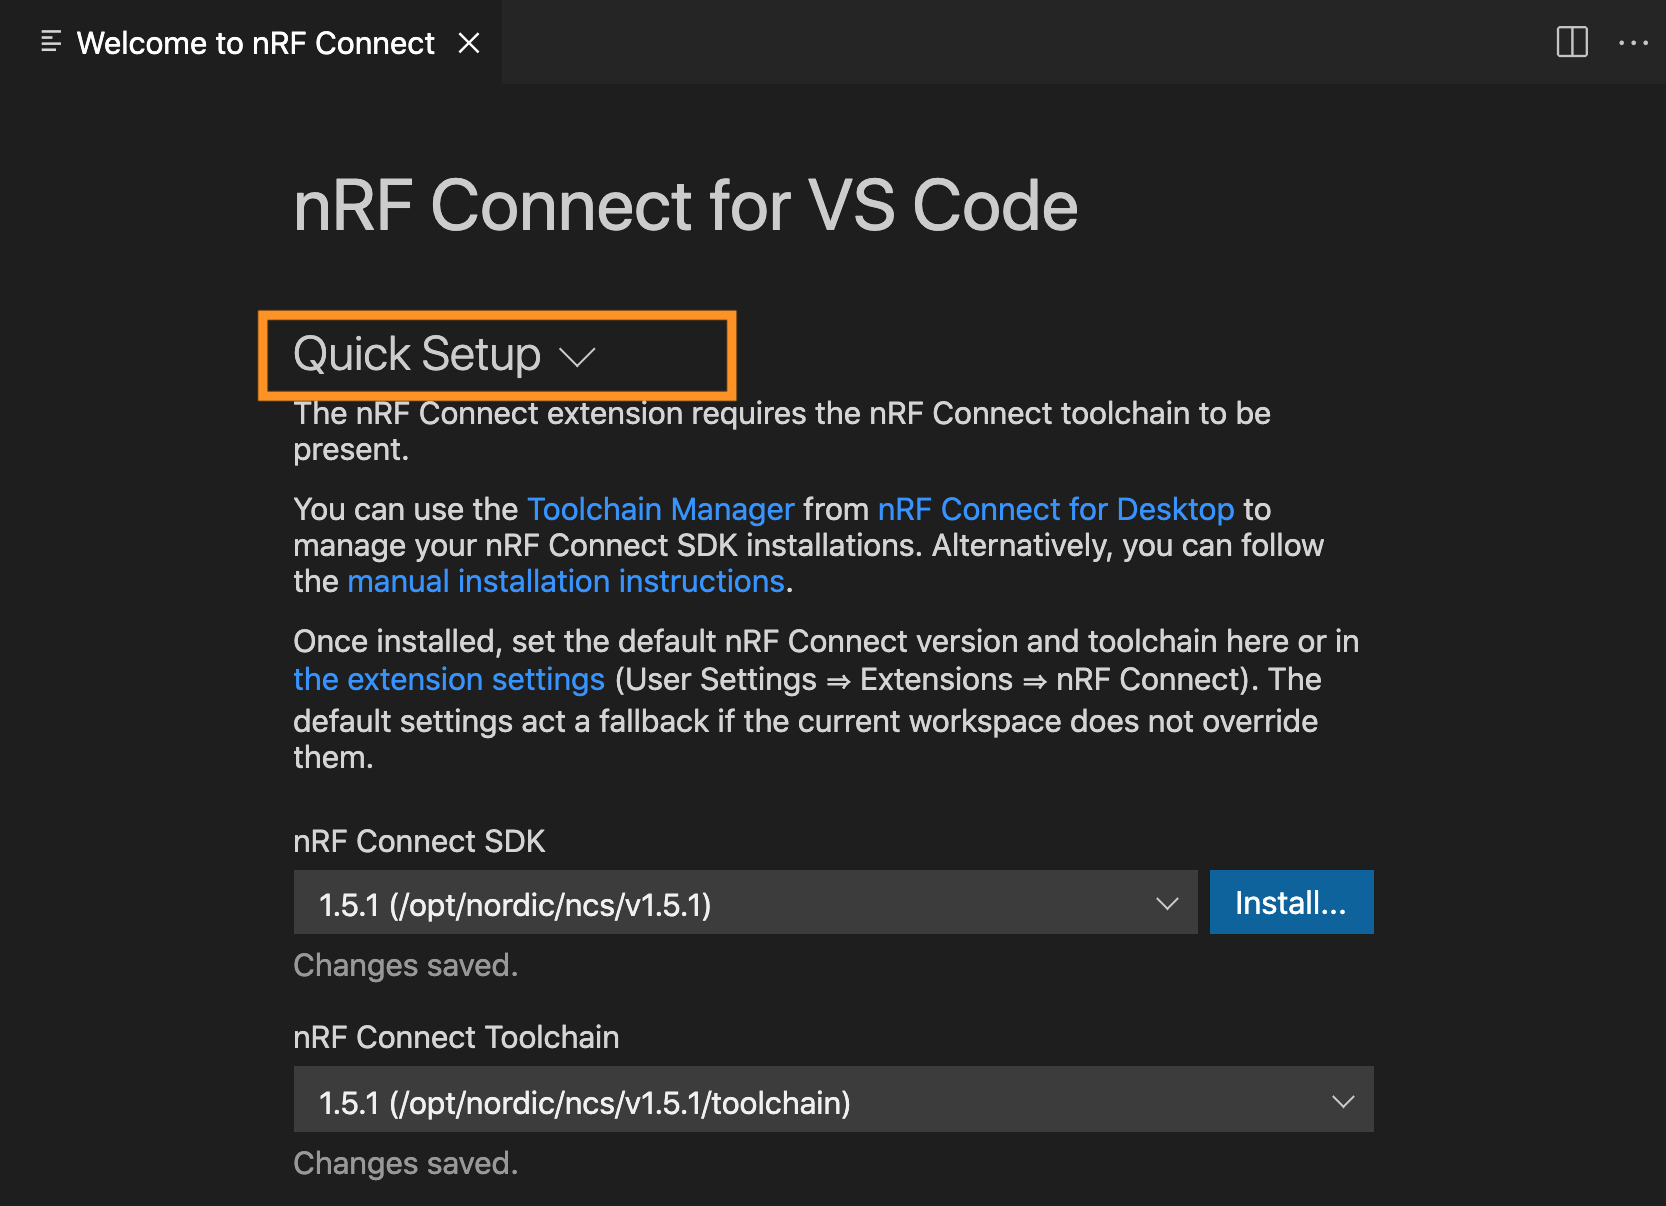
If one has not previously installed the nRF Connect SDK, you may do so now by clicking the Install option else just select the nRF Connect SDK that’s already on your machine followed by the NCS Toolchain version. Here, the nRF Connect SDK version is v1.5.1 and the corresponding toolchain that comes with it.
You can now explore other options under Getting Started section. We will now delve right into creating our new application.
Creating Your First Project
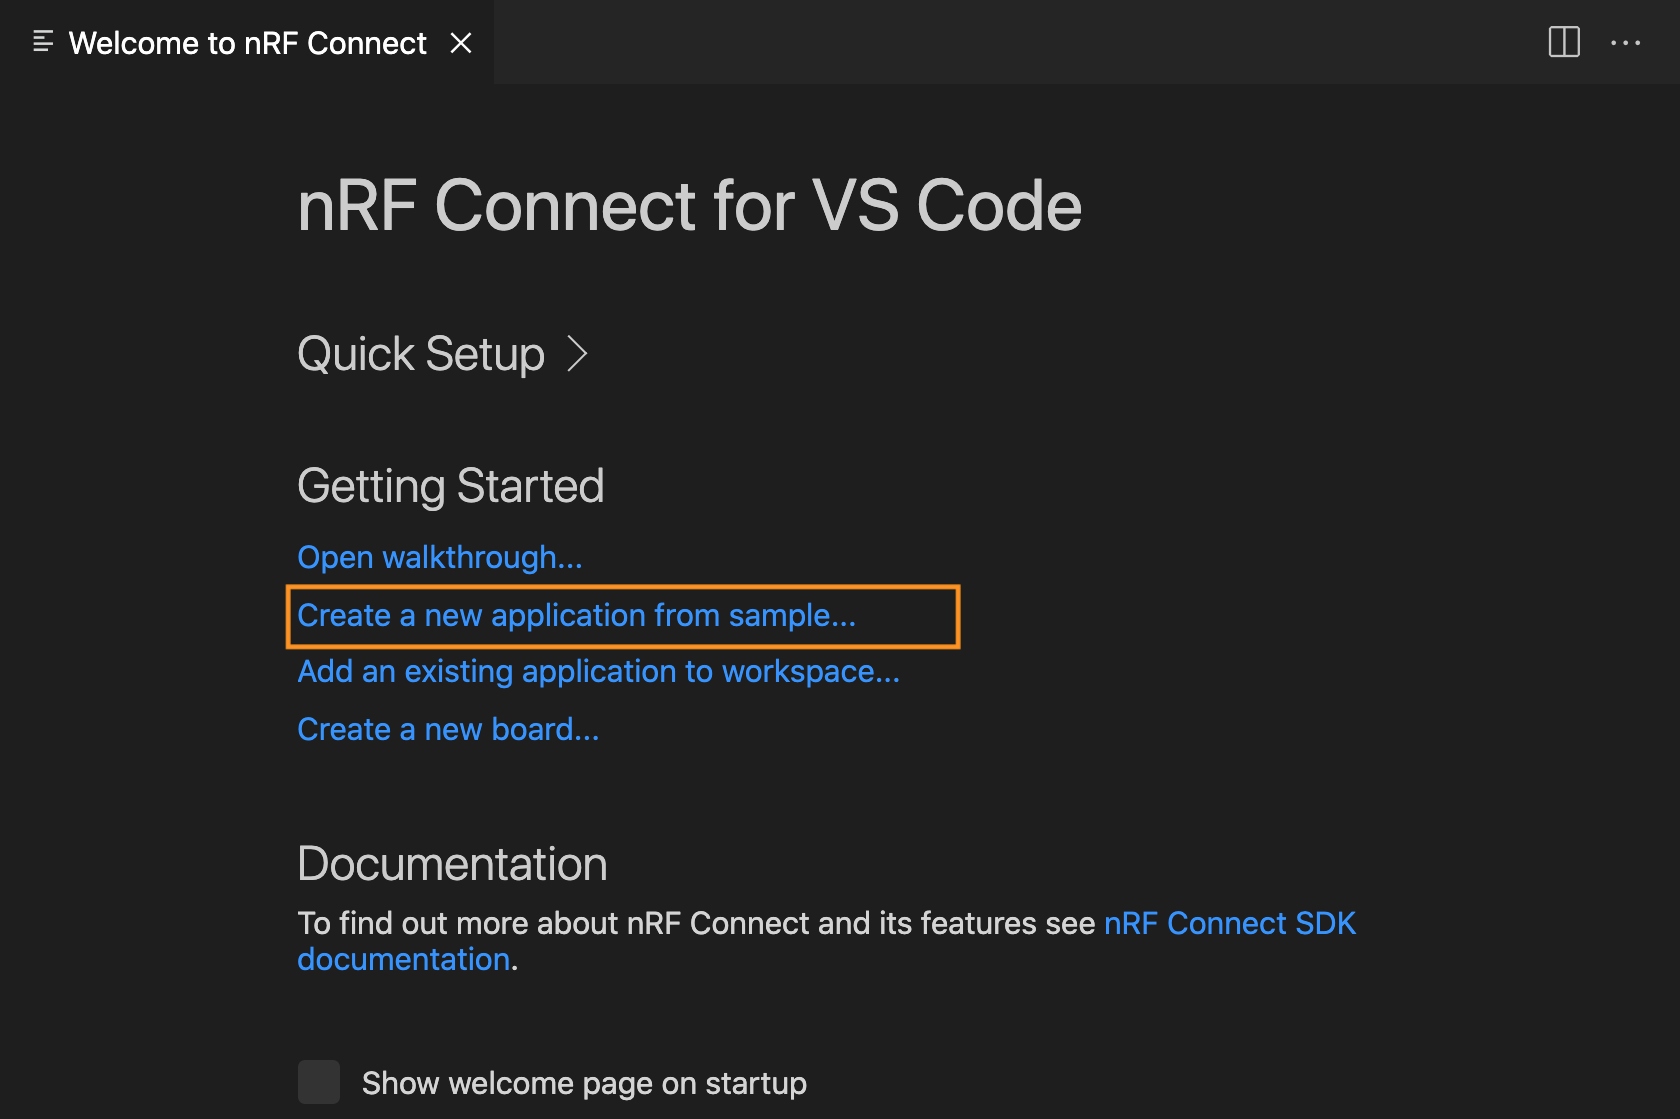
To create a new project directly using the extension, click on Create a new application from the sample.
This will open a New Application VS Code tab as follows:
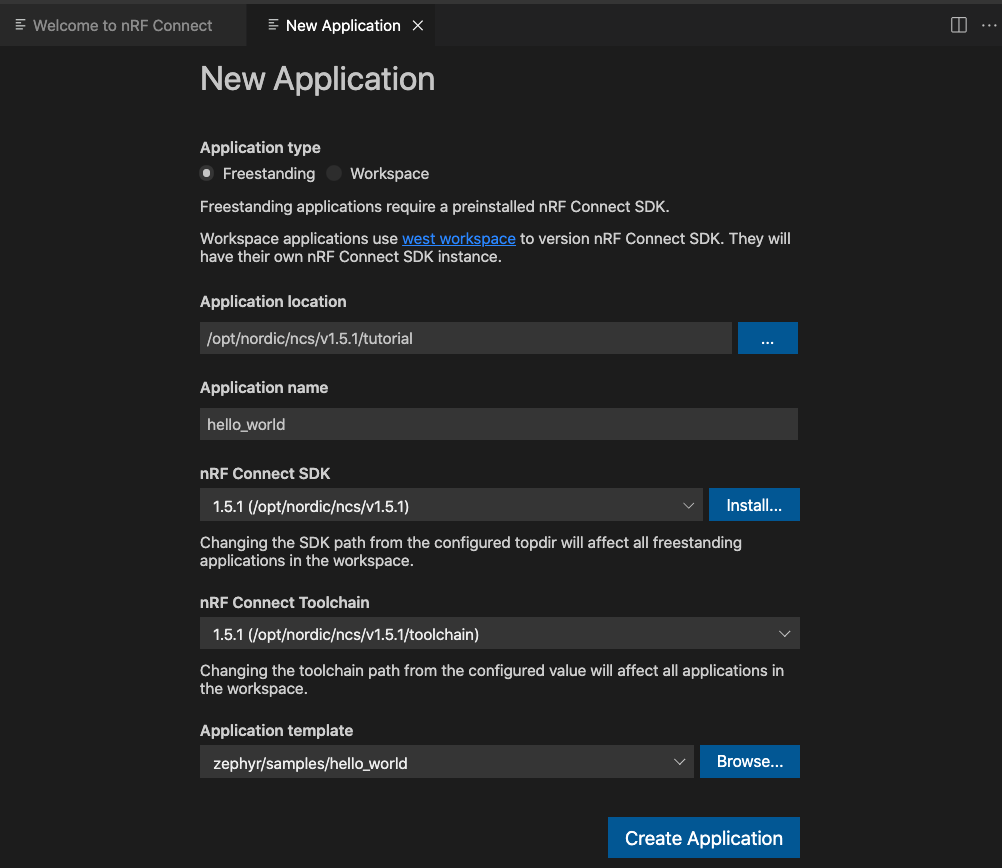
nRF Connect extension allows developers to either create:
- A Freestanding application that utilizes the preinstalled nRF Connect SDK on your machine.
- A Workspace application that uses west workspace to check out the different versions of the nRF Connect SDK from the git repo, creating their won SDK instances.
For this tutorial, we will create a Freestanding application. First, choose where you want your application folder and its associated files to be created. Give your application a name without any whitespace characters or symbols. Next, make sure the SDK and Toolchain versions that you want to work on are correct and select an Application Template for your project. Here, we will go with the hello_world sample that comes with the Zephyr samples. Finally, click Create Application.
If everything is configured correctly, you will now see your sample application being generated with its all associated files under the APPLICATIONS tab.
So far so good! Pat your shoulder, you are on to something cool.
Compiling and Uploading the Firmware
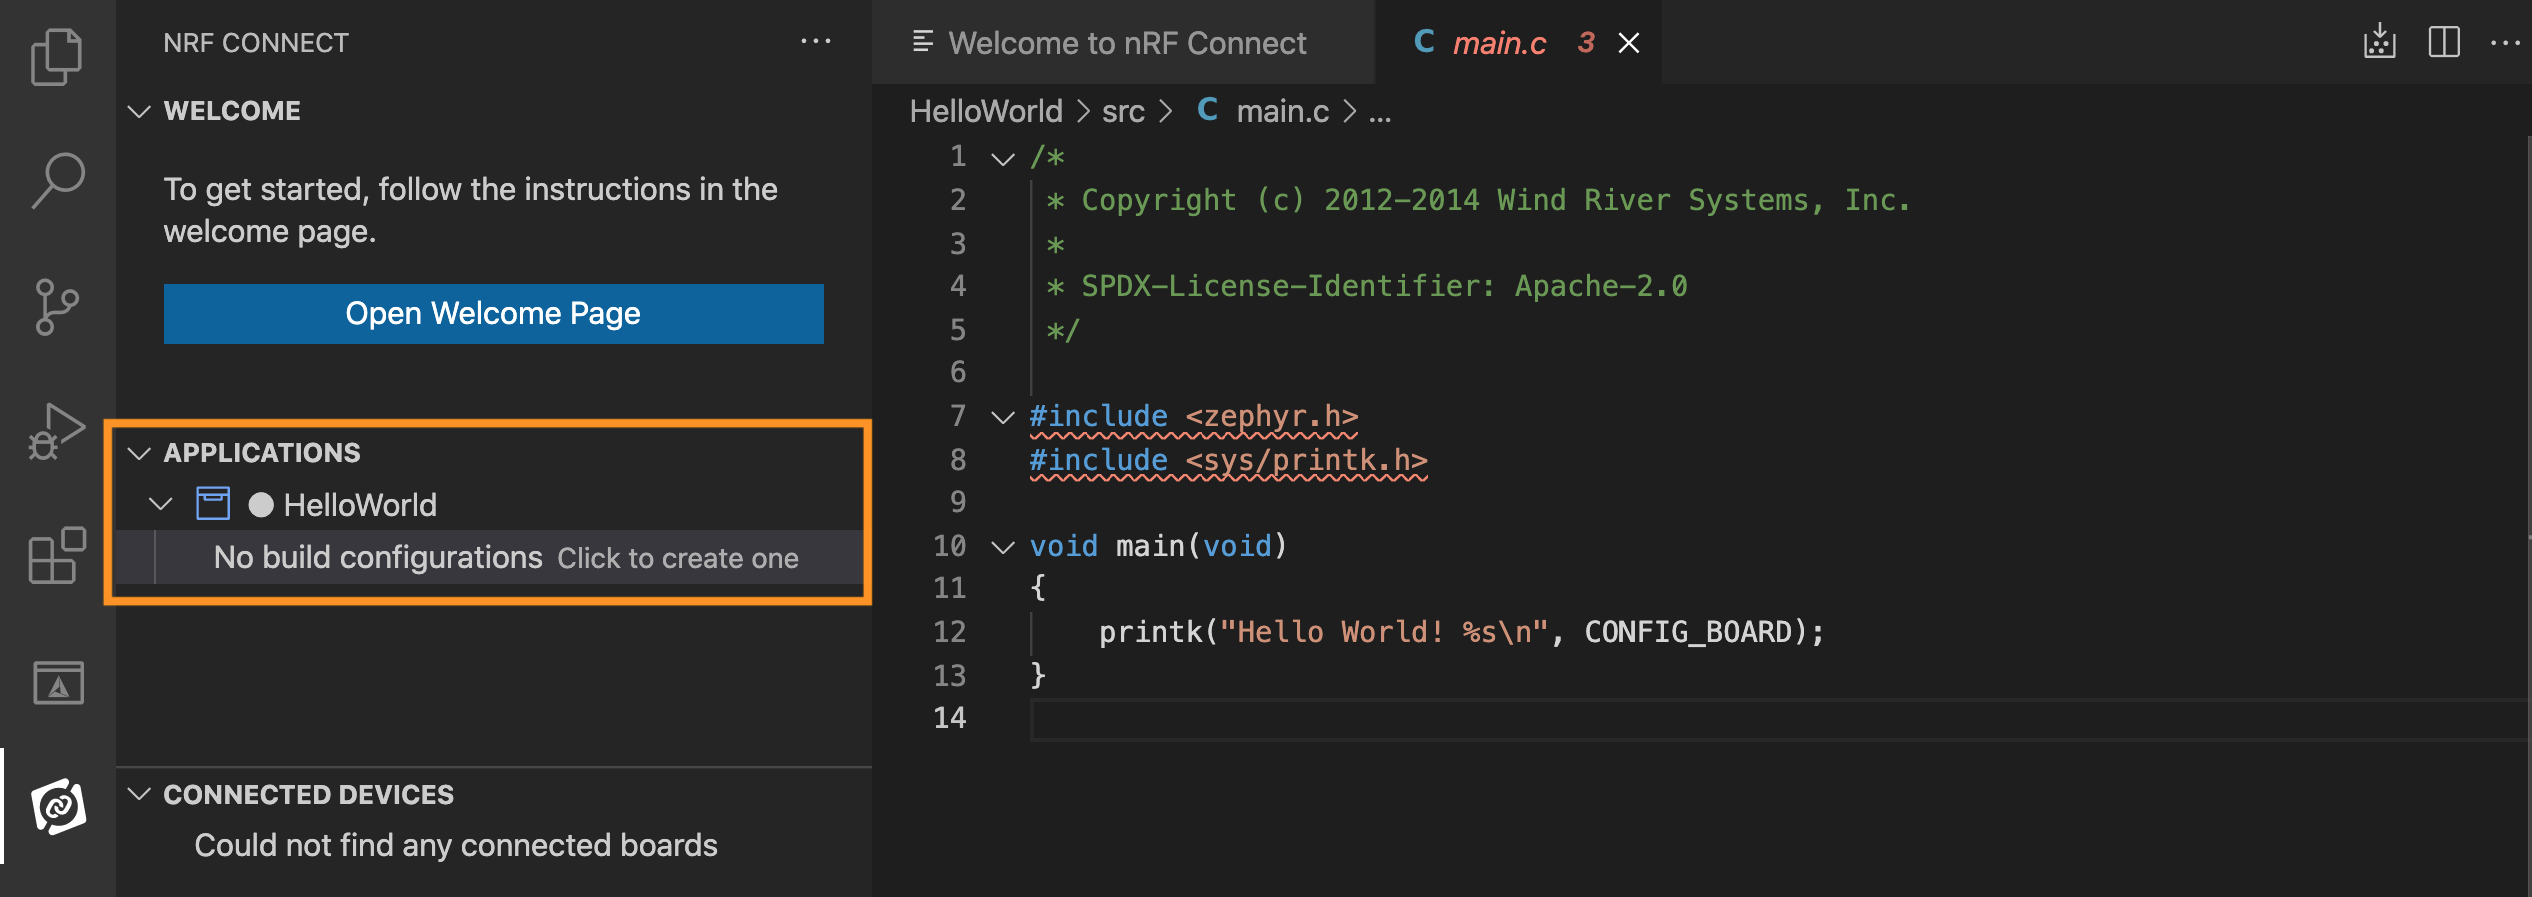
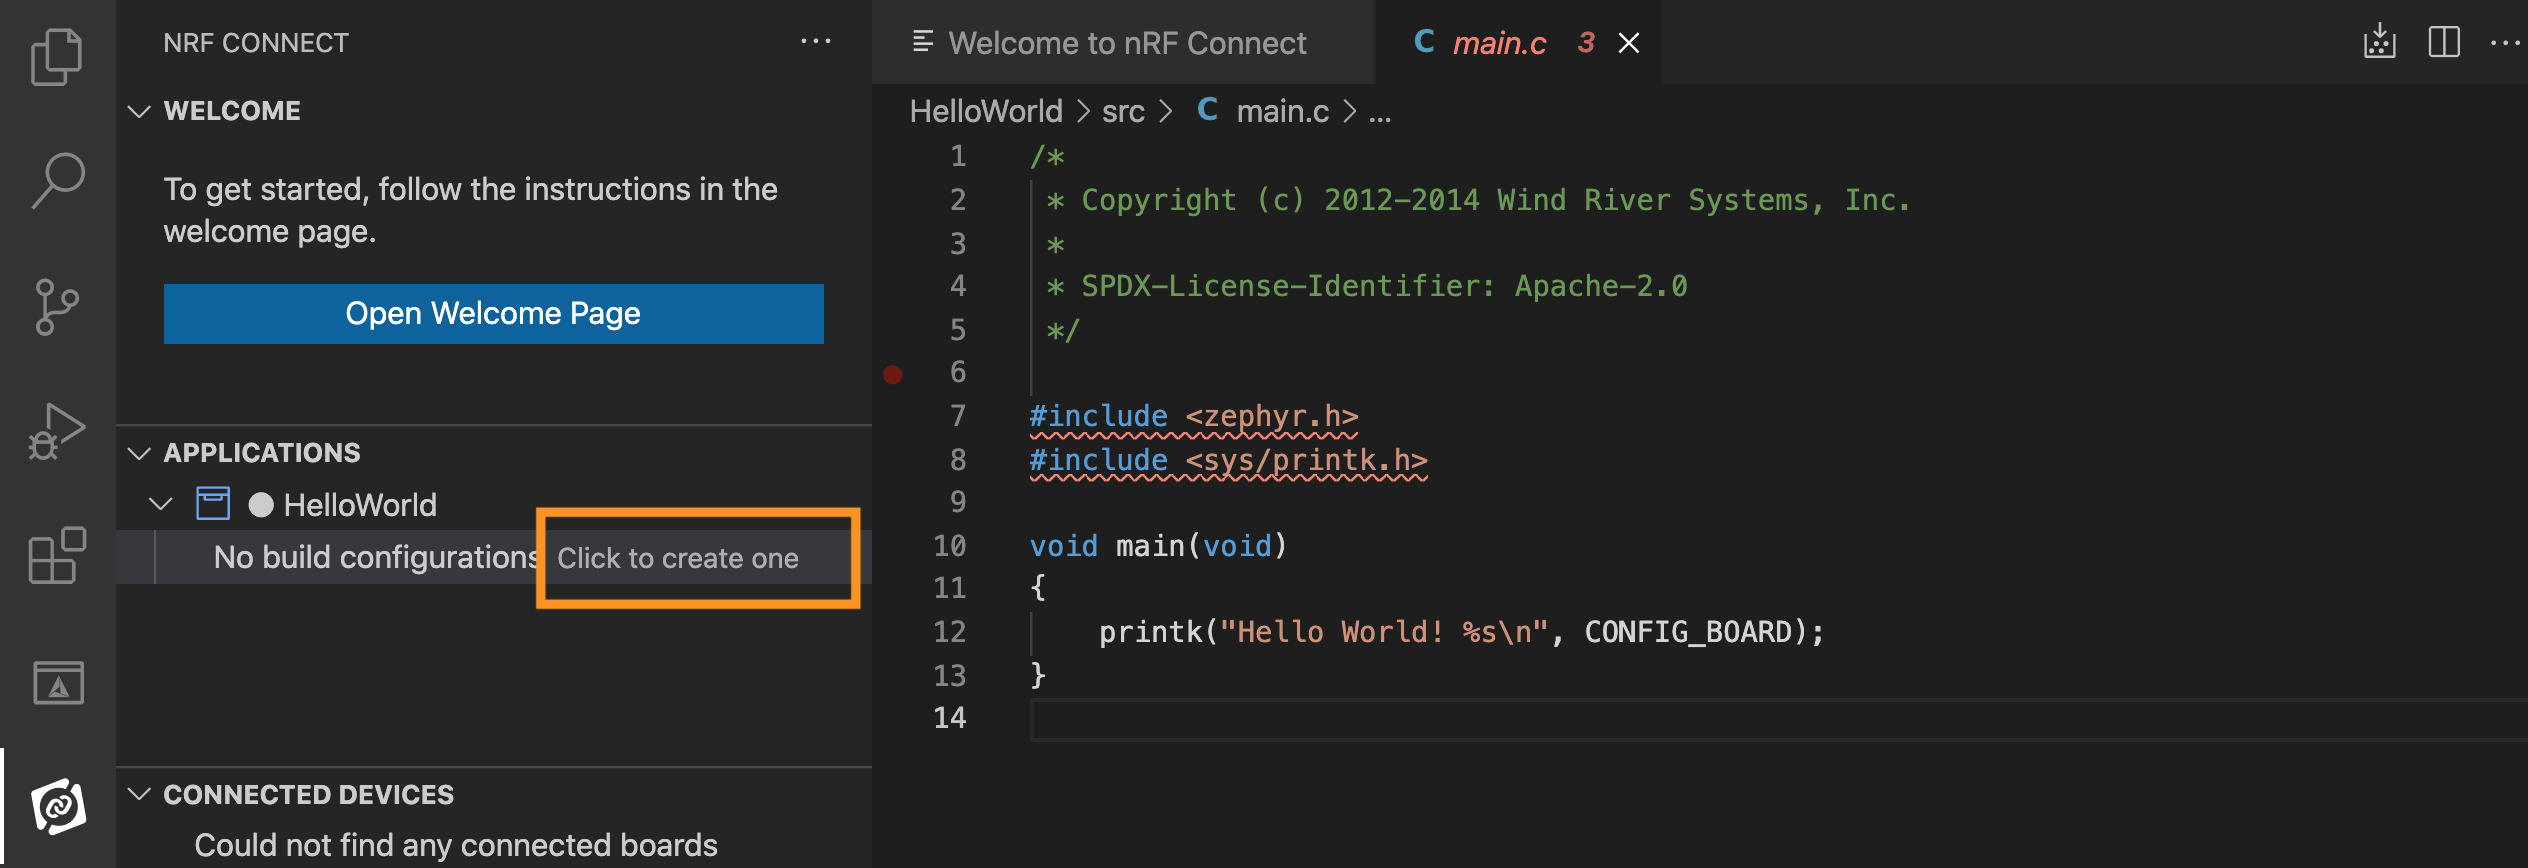
Prior to compiling our above-generated application, we need to generate the device build configuration for our project, by clicking on Click to create one option as shown below:
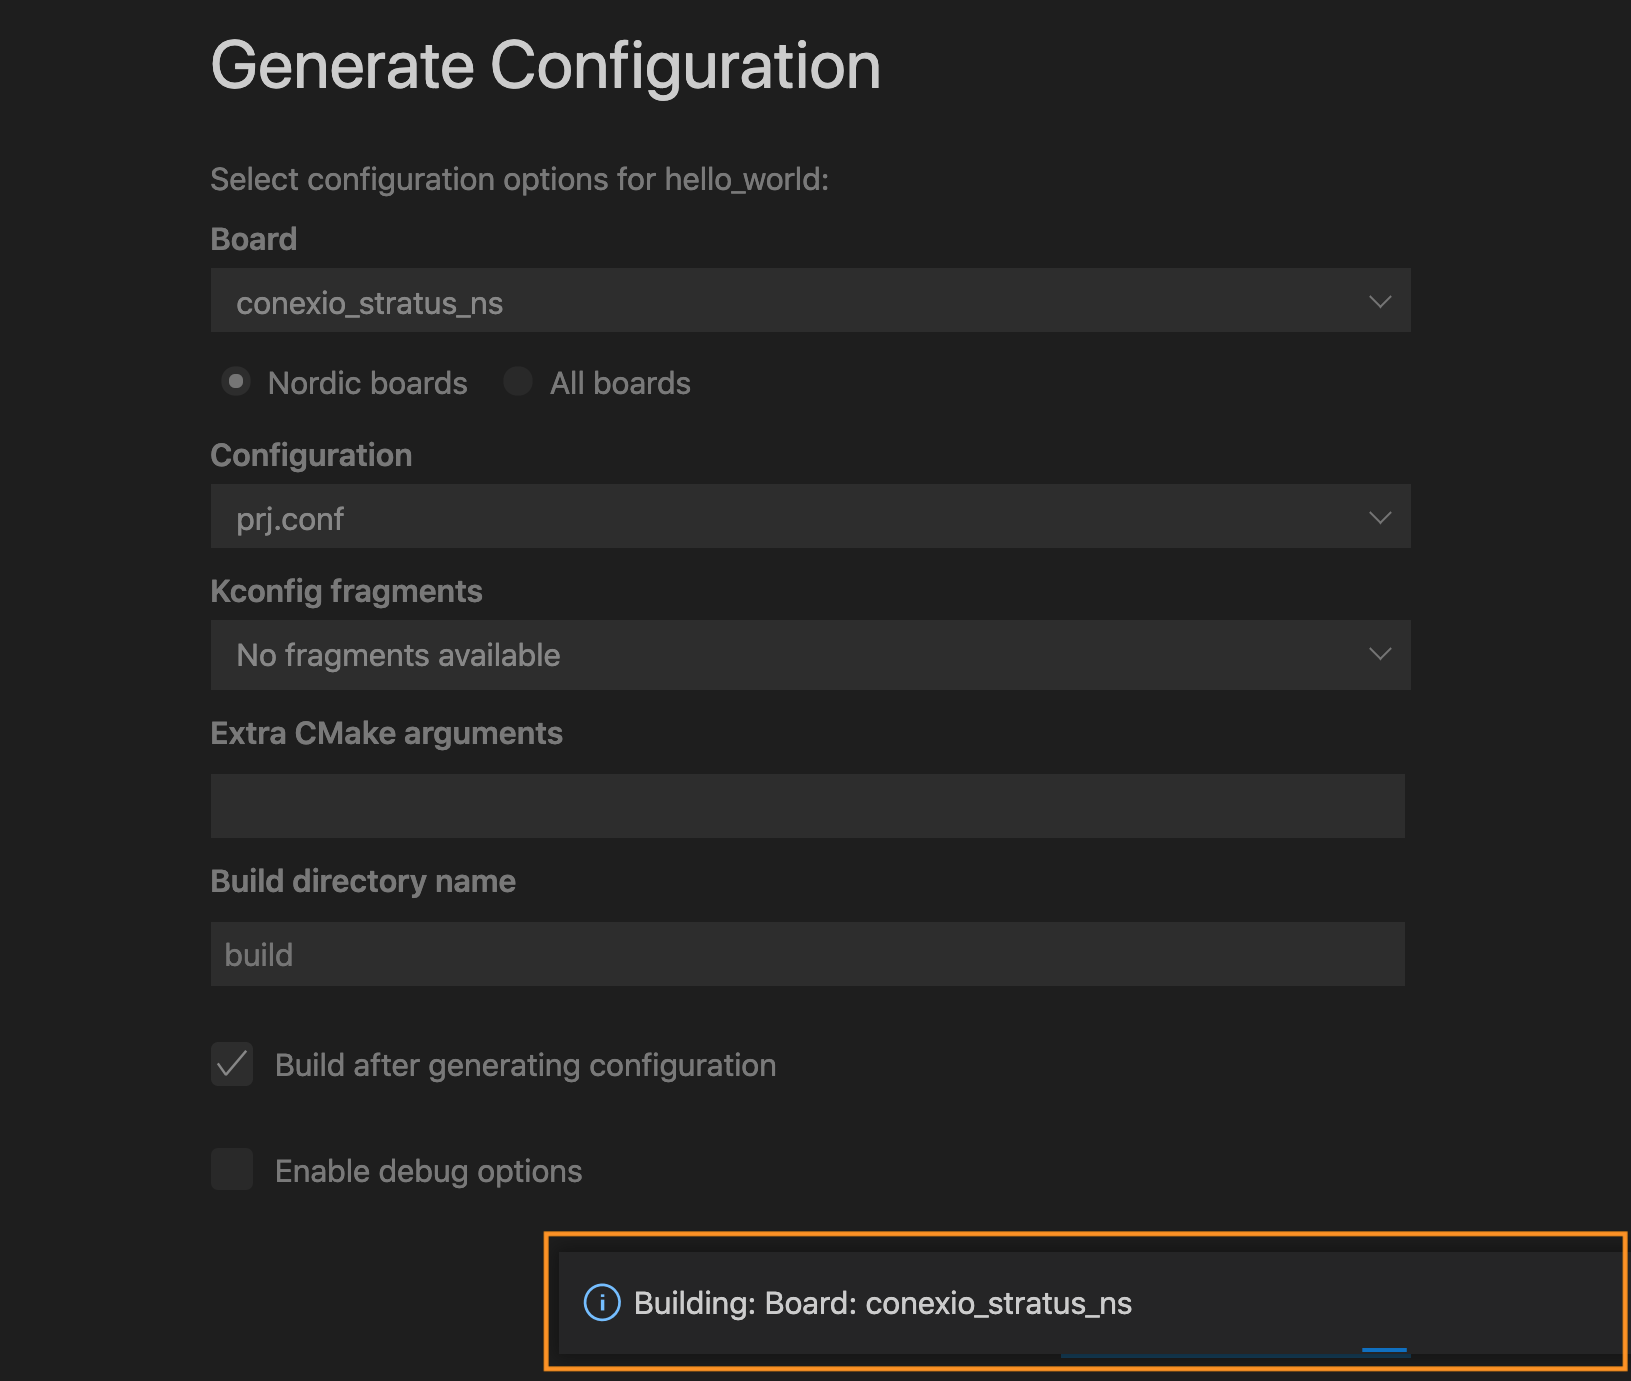
This opens a new tab, asking the user to select the board for which the build configurations will be generated.

Here we have selected our specific conexio_stratus board with the build target
conexio_stratus_ns
for the non-secure domain. Next, click Generate Config to start the Zephyr application build process. Now, you should see the build process kicking in the background and generating the required files and binaries for your sample application.
Once the project is compiled successfully, in the project navigation panel, you will see all the generated files. Have a look at these files and structures.
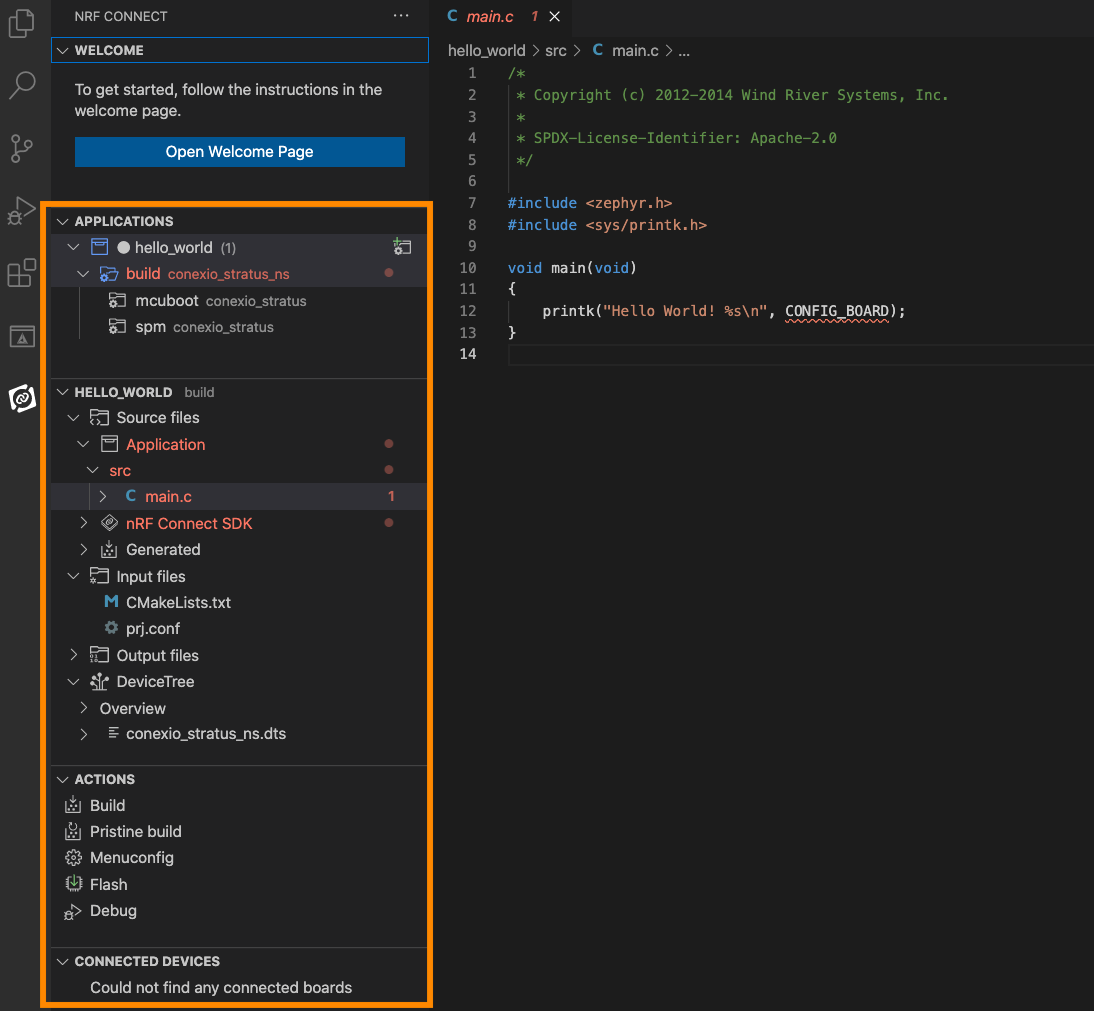
The main code files are located in a subdirectory called src, which is an abbreviation for “source”.On the left side pane, you should see your project listed, and beneath it, you’ll see a number of subdirectories. Expand the src subdirectory by clicking on it and you should see a main.c file. Click on this file to open it in the VS editor window.
The file structure and the output files are similar to those created using command-line tools in Zephyr RTOS. The only difference is that instead of manually creating those, the extension is doing all those on your behalf. This is the beauty of working with IDEs. In addition, now there is also a DeviceTree to inspect the board definitions.
Under the project directory, there is now also the ACTIONS tab that lists some of the main command buttons such as Build, Pristine build, Menuconfig, Flash, and Debug.
Behind the scene…
Let’s look at what’s actually happening when the extension invokes some of the commands:
The Build button builds the Zephyr application from the source and actually invokes
west build -b <BOARD> --build-dir path/to/build/directory
where the source directory is automatically selected by the extension, i.e., the active project that the developer intends to compile.

Selecting Pristine build generates a new build directory and removes all byproducts from previous builds.
west build --pristine -b <BOARD> --build-dir path/to/build/directory
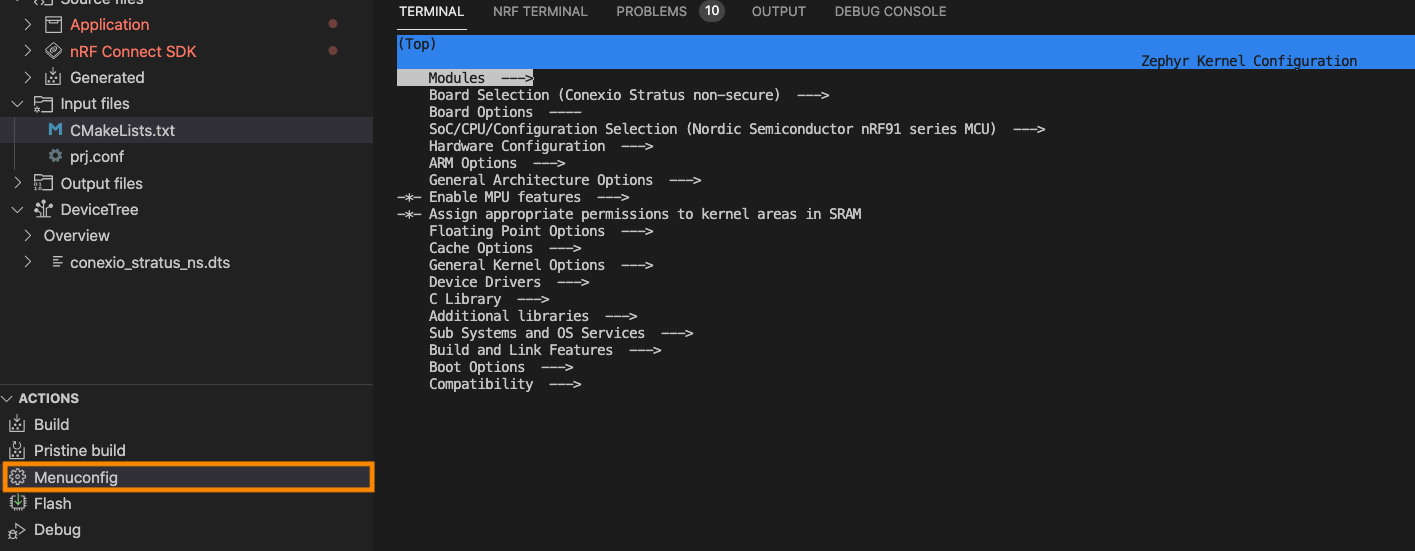
One of the important commands that many of you might not be aware of is menuconfig: a curses-based interface that runs in the terminal for exploring the available Zephyr Kconfig options and making temporary changes. Hitting the “Menuconfig” will bring your project’s Zephyr kernel configurations interface allowing you to change different configurations from the terminal. More information can be found in the Zephyr Project documentation.
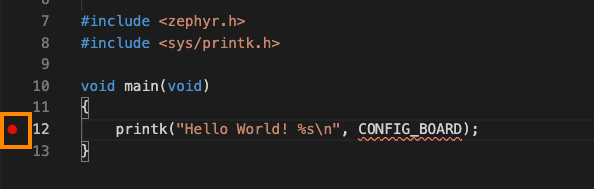
Before we move on to flashing the code to the device, let’s have a quick look at the project source code.
/*
* Copyright (c) 2012-2014 Wind River Systems, Inc.
*
* SPDX-License-Identifier: Apache-2.0
*/

#include <zephyr.h>
#include <sys/printk.h>

void main(void)
{
   printk("Hello World! %s\n", CONFIG_BOARD);
}
The code hardly needs any description, it’s basically the hello world example that you know (or at least know) which will get printed once after resetting your device.
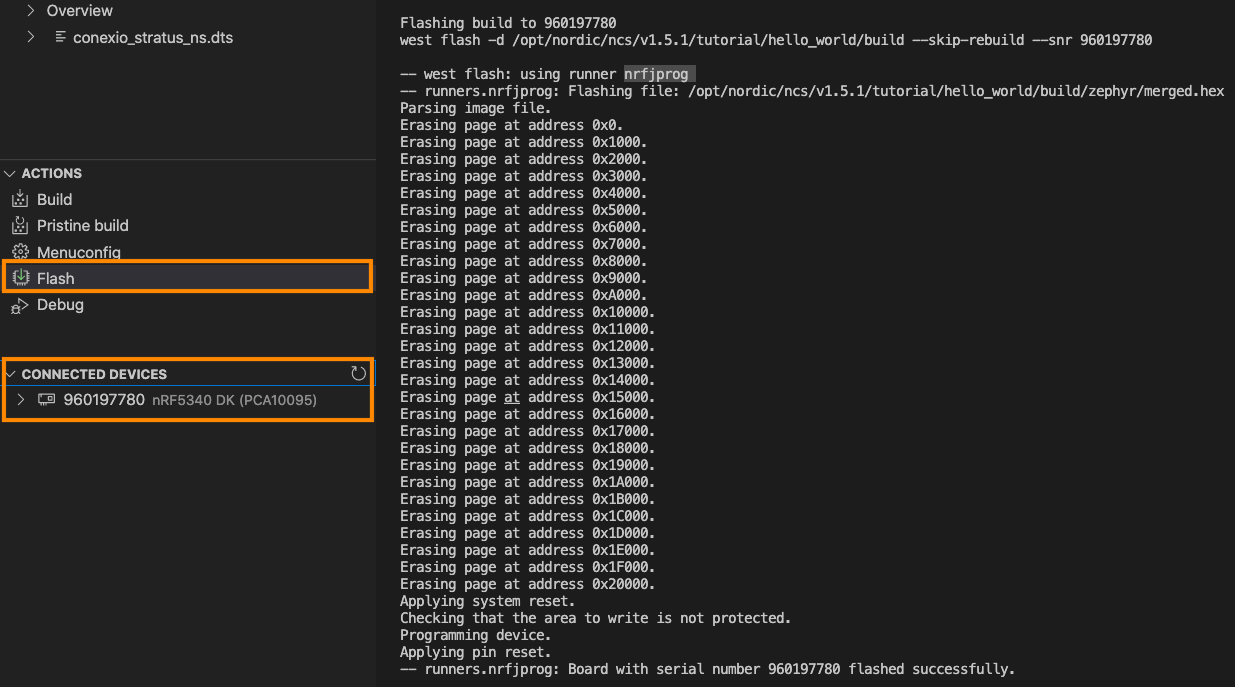
The next step is to upload it to the board, so let’s connect our board first. Here, we will connect the nRF5340 DK from Nordic which will be used to flash the Conexio stratus kit connected via the JTAG SWD interface. Once the board is connected and recognized, it will get listed under the CONNECTED DEVICES tab as shown.
Next, click on the Flash button. nRF Connect for VS Code will upload the compiled code to the selected board. For flashing, first, the extension specifies the build directory, using
west flash --build-dir path/to/build/directory
And then chooses a runner, in this case, west flashes your board with nrfjprog by default by first erasing the required sectors and then writing the program after which it resets the device.
Upon success, you should be able to see hello world printed as a result after connecting to the serial terminal. nRF Connect extension allows directly starting a terminal within the VS Code environment. To get it working, first, click on the view tab and then on the Command Palette. A dropdown window will appear showing all the available commands.
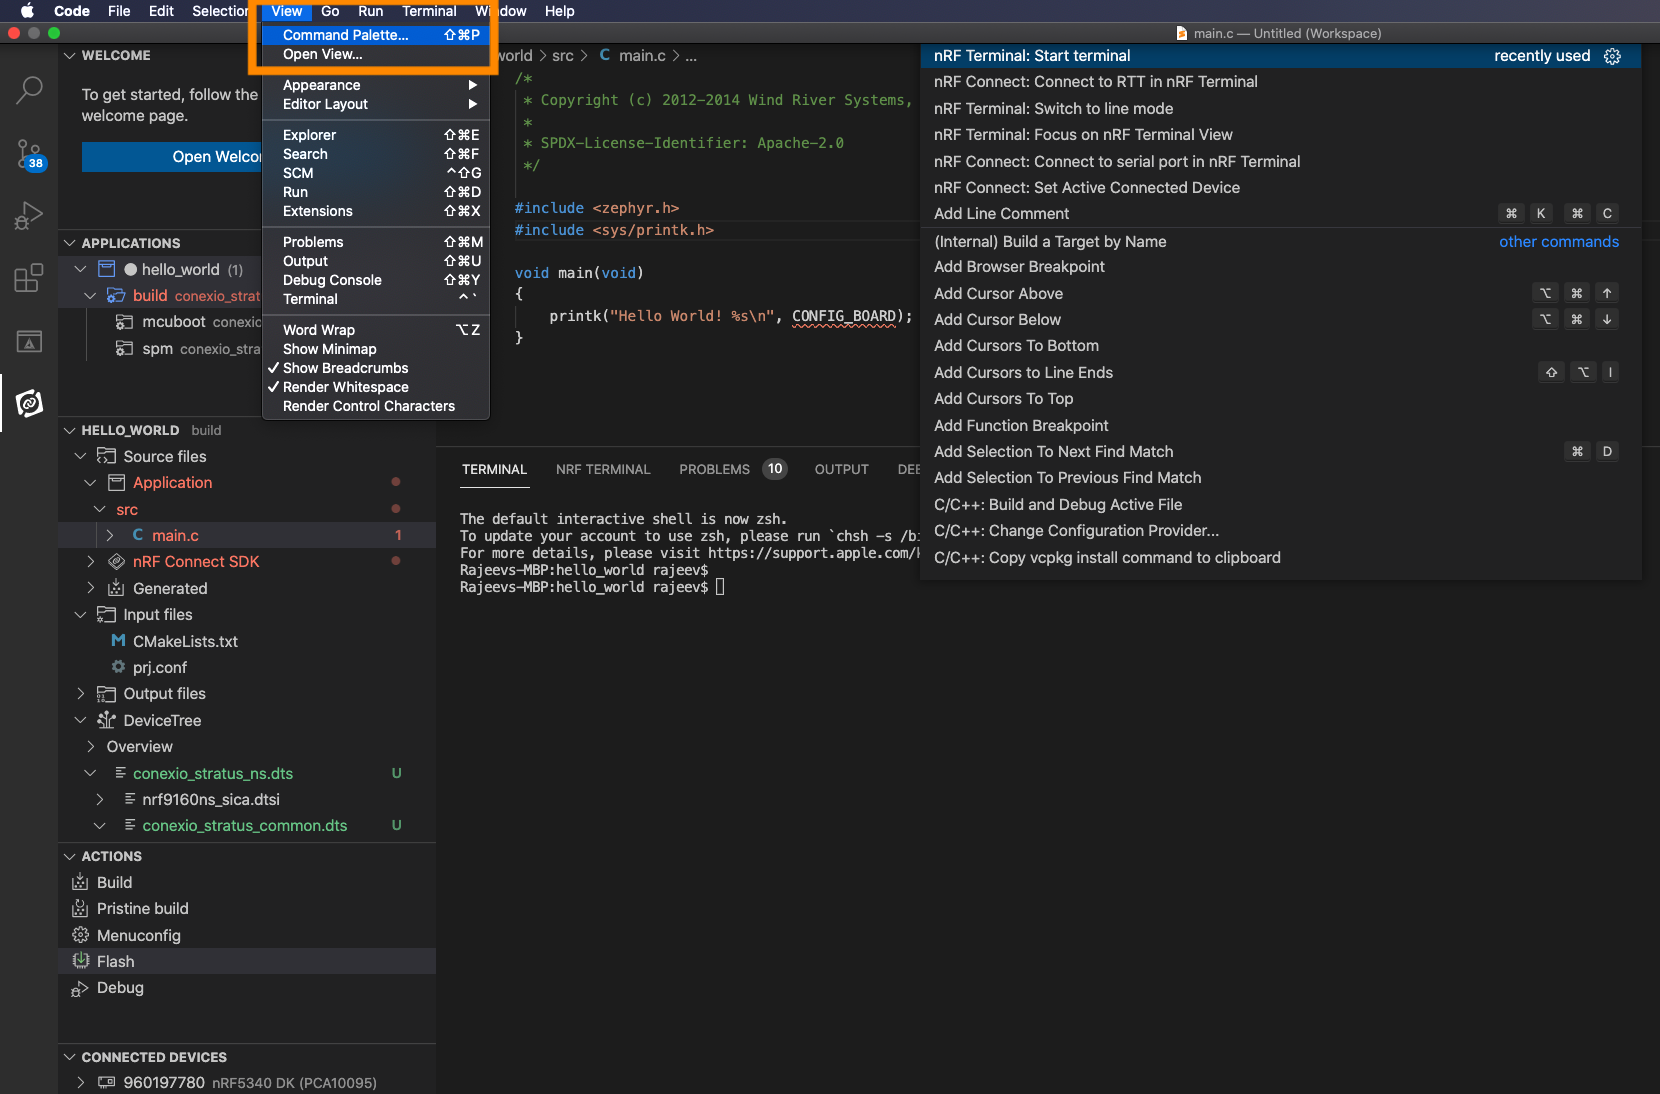
Then select nRF Terminal: Start terminal which will prompt you for the connection type and details. You can connect via serial port or via RTT.
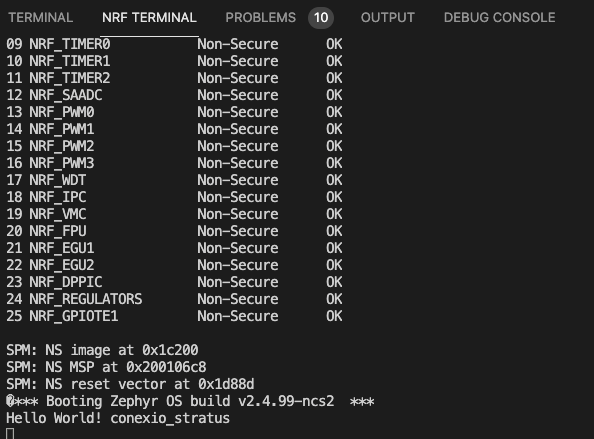
An NRF TERMINAL window will open printing out the Hello World! as shown after hitting reset.
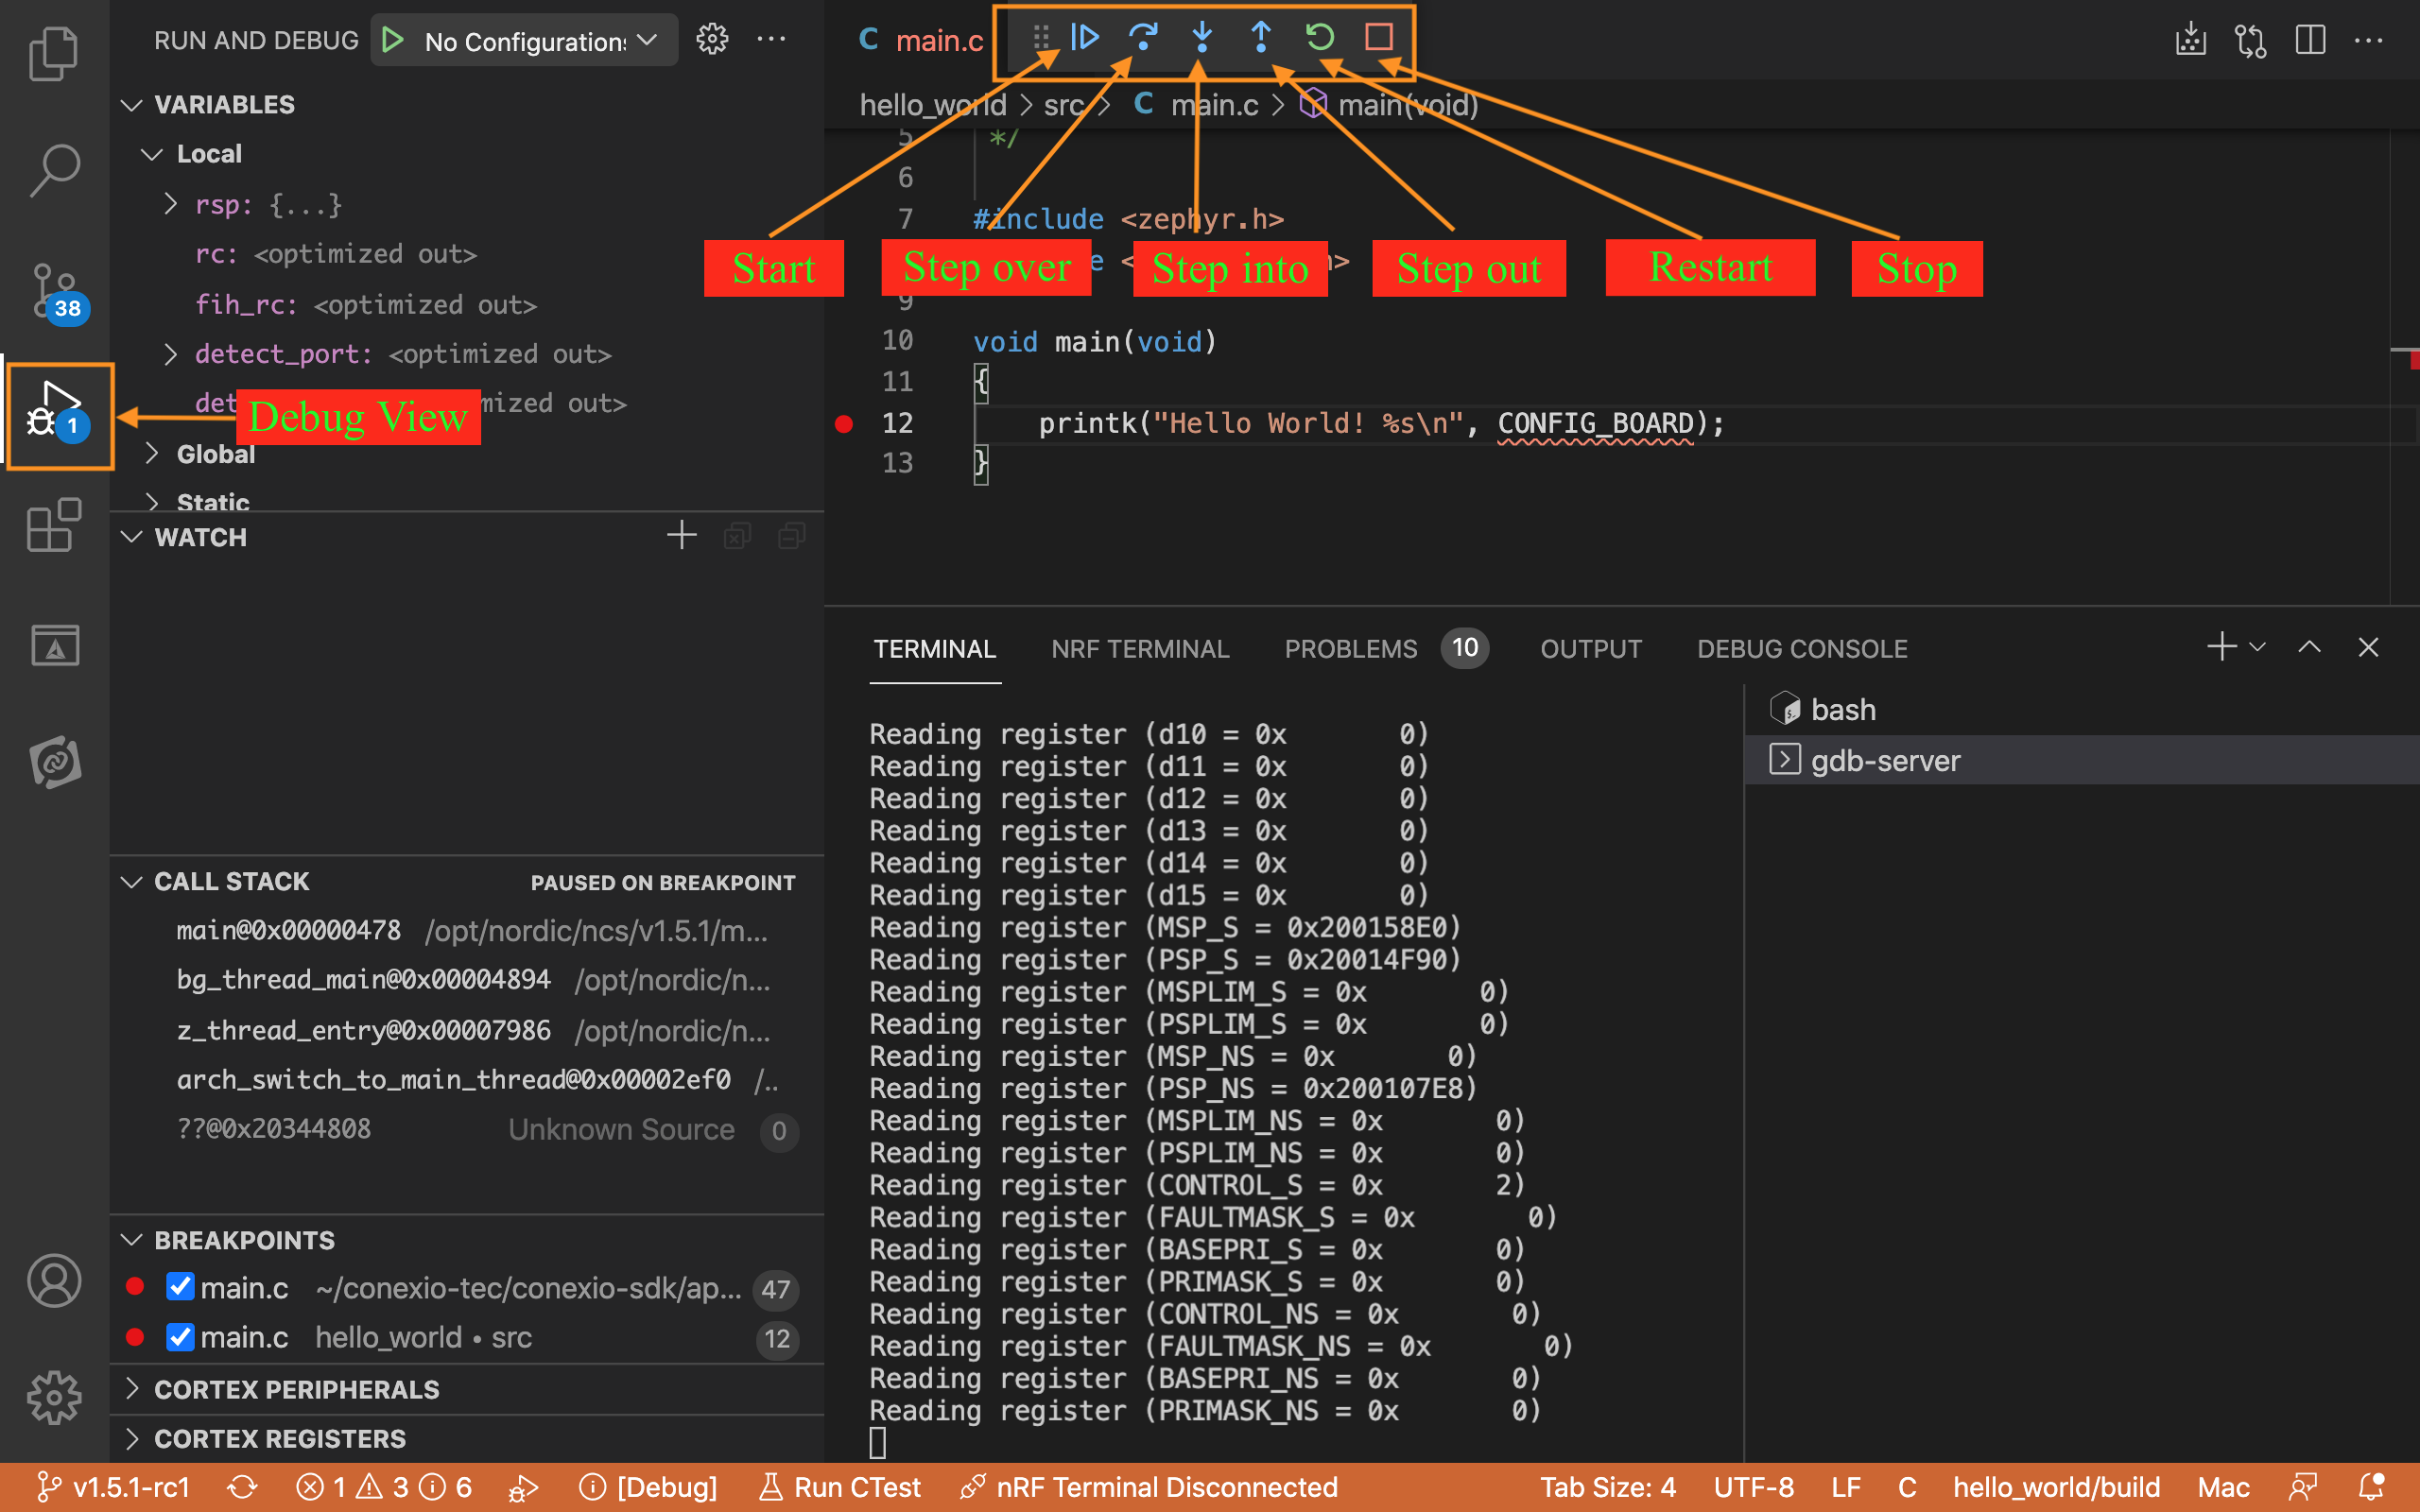
Debugging the Firmware
Let’s explore one of the last features of the nRF Connect for VS Code, i.e., code debugging. Since Nordic nRF5340-DK includes an onboard debug probe we can use Debugging capabilities without any extra configuration. To start the debug session, first, lets set a breakpoint in our code and hit the “Debug” button in the ACTIONS tab.
Once the debug session starts, one can walk through the code using control buttons, set breakpoints, add variables to the Watch window shown below.
Conclusion
The learning curve for nRF Connect for VS Code is short and fast. With the VS code editor and its powerful code completion, you can now write codes faster and better for your Zephyr projects.
Hopefully, in the future release, all the dependencies required to make the nRF Connect extension work will be installed and managed automatically.
All in all, nRF Connect for VS Code is a major step forward for the Zephyr RTOS development ecosystem. For me at least, it is going to completely replace my day-to-day development environment. The toolchain management system within the extension is great and will bring major productivity boosts to embedded development.
I’ll be using nRF Connect for VS Code for many of my upcoming projects, and we will also revisit nRF Connect for VS Code in the near future to learn more about the advanced features of this wonderful development environment when the full version is released by the Nordic Semi.
If you have any questions or comments, please feel free to email me or post them on Nordic’s tech support forum.
Happy coding!